Quantcast
Channel: Spaceman Spiff's Blog Full O' Battlemechs...and more.
Viewing all 36 articles
Browse latest View live

A New Year...Time To Break Out The Big Guns!

$
0
0
Well, here we go with a new year! Hope everyone made it to the new year without having to post bail. I guess I'll start this year out with something rather big...A 1:200 scale MAC II Monster. I can't begin to tell you how long I have tried to find one of these for under $100. Then suddenly not one, but TWO fell into my clutches by way of some fancy trade work! When it rains, it pours! Unfortunately both of them sat for a while in my "to do" box while I ended up working unreasonable amounts of overtime at my real job. Well, I squeaked in some hobby time here and there and, as you will soon see, I amassed quite a number of finished pieces. Shall we get on with the show?


The name says it all.....The cheesecake is a decal, but I painted her name. I can rarely leave a model or a mini in stock condition, which is evident in the chin cannon. I sculpted the housing and attached a gun from some Heavy Gear spare parts.

Here she is with a few supporting units. I mainly wanted additional minis in the picture to show off her immense size!

I also added some dirt to her feet. Don't expect her to wipe them off before entering your city.

6 Mech kills and , yes, a dropship!

Rear view.

Rear view with "pants down".

I painted a few details in the engine bay with florescent paint. When I light it up with a UV light, they glow!


I didn't want the arms to be missile launchers so I applied some plastic gem stones to make the barrels look like she's warming up the heavy particle cannons!

A shot of the chin turret and the cockpit...or where I think the cockpit should be.


Well, she was worth the wait! The second one is going to be extensively modified....imagine enormous gattling cannons instead of city busters.

The Show Isn't Over Yet....

$
0
0
Alright, here we go with a whole lot of new air power. Let's start with a light aerospace fighter that I sculpted. Sometimes I look through all my old lead and pewter minis for some inspiration. I found that inspiration in an old fighter from the classic Interceptor game by FASA. Of course, the original mini is too small for my preferred scale, so I dug into the Super Sculpey and began to make one in the proper size....


Isn't she cute?

The entire body is sculpted from Super Sculpey with the exception of some small details like the gun barrels and afterburner nozzles.


I put her next to an F-Toys 1:144 Harrier to show just how small she is. I do not recall what the fighter's name was in the Interceptor game, but I do know it was a light fighter.


In keeping with the spirit of air superiority, here's a whole squadron of some familiar flyers. These are Hot Wheels toys that I determined were as pretty damn close to 10mm as I thought possible. I was turned on to these when a friend of mine posted a pic of a Batman flyer ornament he had in his Christmas tree. I mentioned that I might need one or two, but he kindly informed me the ornament was quite large and I should look to the Matchbox or Hot Wheels toys for something a bit more my size. Here's a helpful bit of info for all you 15mm gamers- the Matchbox bat flyer is right up your alley! I saw them at my local Target store. I had to get the Hot Wheels off of E-Bay where I found a guy selling SIX of them! CHA-CHING!!


New paint jobs and A few upgrades! I decided to paint 3 in a standard military green, 2 in an urban grey, and one with desert wasteland camo.
The one on the left is stock. The one on the right has a pair of larger caliber cannons.
Say cheesecake!

Why not rocket pods? I sculpted a pair for this one.


Here is the belly. I had to grind off the manufacturer's raised letters and added some ammo drums for the larger cannons.

Wasteland camo with the standard load-out.


Are we having fun yet? Show's still not quite over, folks. Hope none of you are on dial-up....
Here is an old project that sat in the "to do" box for a loooong time before I remembered it was in there. When my TIE fighter forces began to grow, I knew this was destined to be a part of it. I'm not sure what it is, but it is from the Star Wars Titanium series of collectables.


Here she is with a squad of TIE-Ds. I'm going to call it the TIE Broadsword- A very heavy assault version for the TIE family.

I sculpted a little launcher pod for the hull surface and the ventral cannon is a spare part from a Wizkids Mechwarrior mini.
I added the engine panel on the top of the hull and the three engine nozzles.
Ventral view showing where I also added some VTOL nozzles.


Still not done.....
Next up are a pair of super-rare Anigrand Chiss Clawcraft. These were included in the 1:144 Anigrand Lambda Imperial shuttle, of which I have one. My friend ( who traded me some wonderful and rare Anigrand models in exchange for my painting services ) gave me the clawcraft out of his kit because he didn't want it. Who was I to say no?


While they have the familiar TIE body, the wings are quite alien and elegant. I wanted to give them a more artistic flare to better represent their alien origin. I put some alien markings on them  and even added a bit of alien nose art to the one on the left. Don't ask me why I have GW necron decals...I haven't the slightest idea how they ended up in my decal box.


Some small patches of color to set them apart.

Those barrels on the arch of the wings are not guns, but maneuvering thrusters!


 Finally we draw to the conclusion of the air power post.....
When I went to Target to find the Bat Flyer, I did not succeed. However, I did discover a few other excellent things to make my trip worthwhile. These are from the Matchbox line of Sky Buster aircraft. Excellent finds for my scale requirements!


A heavy lift Helicopter!
I added a few extra details like the hydraulic hoses.


I added the cargo clamps, too. I sculpted the clamps and the clamp housing.

I also added the hazard lights to the belly and the hatches on the nose.

A pair of super-cool fighter jets!

I decided to go with a dark paint scheme for a night fighter.


Since there were no guns or missiles on her to begin with, I had to sculpt my own. I figured a pair of massive gatling cannons in a pod on the belly would do the trick. I also added a pair of VTOL nozzles and an ECM dome under the nose.

The second bird I just went with a wild sky theme.

Hello Nurse...

This one has the same modular pod on the belly, but it is sporting a pair of heavy particle cannons instead.


That finally concludes the Spaceman Spiff air show. I do hope you enjoyed it! Stay turned for the ground forces....


Ground Pounders Need Love, Too.

$
0
0
WHEW! After all that air power, I better give the ground forces a bit of face time. First up is a custom sculpted alien hover/grav tank. I guess you could say my inspiration came from countless hours of playing Halo. One night I was just kinda screwing around in my studio and got the itch to sculpt something...well, different.


Not a very big tank, but she is packin'! This is a picture taken in standard light.


This is a picture taken with the UV light on. Yep, she glows!


I also gave her an iridescent, sparkling paint job to further convey the alien nature of this tank.


Onto some more standard fare. You may be able to guess where I got my inspiration for these....Again, I'm not really sure why I built these, but enjoy them anyway!


Believe it or not, these are Gundam shields that I turned into land speeders! I made the rear spoilers out of plastic card stock. The cockpits are just blobs of epoxy.
The speeder on the left needs no introduction. I sculpted it myself, other than the driver and the cargo stowed behind the seats. The speeder on the right is a Micro Machine speed boat. I stuck a pair of big jets and a NOS tank on the back!
Luke's speeder isn't exact...but it is fine by my standards!


Now for something just a little different. I am currently working on a large commission of vehicles and battle armor suits for a good friend of mine. In return for my services, he shows up with a big collection of super rare and OOP Anigrand Star Wars models. I took up the offer the same way I would answer Vanessa Hudgens if she called me up and asked me out- there is no way I could say no! Anyway, he's a 15mm gamer and has a selection of 15mm goodies for me to paint up. I like to step outside of my 10mm scale once in a while, and it is that much easier when the minis are totally sweet! Here are the first few vees that I have finished. These vehicles are resin-cast and made by Antenocitis Workshop:
http://www.antenocitisworkshop.com/governance-of-technology/g-o-t-vehicles-15mm.html


A pair of 15mm Dodge-Tata Zebu patrol cars and a 15mm T-Pea hunchback APC/MRAP.
My friend wanted his scout cars armed, so he also supplied me with a bunch of spare weapons. Naturally, I thought the miniguns were a good choice!

The one thing I felt was missing from the minigun was an ammo feed. I created my own ammo belts using little zip ties. I also drilled out some bolt holes for the "hubcaps".

Scout cars need radio antennae, right? Hair brush bristles fit the part perfectly.

The APC was already cool-looking, but I thought it should have a front bumper. So, of course, I added one.


See? This post was short and sweet! I have tons of projects lined up for the next few months which means there will be lots more to show eventually. Plus, I am going to try to make a tutorial video this year. Thank you all for dropping by and a special thanks if you actually subscribe! I am amazed that I have acquired 93 followers!

The Joy Of 15mm Scale.

$
0
0
Nothing gets me more psyched up to paint miniatures than a fantastic miniature to start with. When a great sculptor comes up with a brilliant mini, I feel it is my duty and honor to give that mini some life. Lately I've been working on a pretty big force of 15mm vehicles for a good friend of mine. Normally I'm a 10mm scale person, but these minis are awesome! It is fun to step out of my comfort zone for a little while, too. While I've been busy on my friend's forces, I also work in time for a few of my own, just so I don't get too burnt out on one thing. My work desk becomes a staging area for minis in various stages of completion. Now I have managed to complete several of these recent projects of which I will now share with all of you.


First up is a whopper of a battlemech in 15mm scale! This girl is HUGE and made entirely of awesome! I ended up buying two of these big girls because I knew one just wouldn't hold all the plans I made up once I saw her. Here is a link to show you what she looks like when you assemble it right out of the package and give you a bit more info on it:
http://gruntz15.proboards.com/index.cgi?action=display&board=trade&thread=892&page=1

If you want one, you can get a hold of the artist here:
mechorder@gmail.com 

Now here is what I have done....


Standing 5.5"/13cm tall, I told you she was a big girl! If you followed my link, you will notice right away that I have made some alterations.

The most noticeable change would probably be the shoulder-mounted rail cannon. The gun came from a set of Armored Core extra weapons. I did a bit of cutting and hacking to integrate the cannon with one of the standard shoulder missile pods it came with so it would fit perfectly to the shoulder.

I added the sensor dome to the missile launcher and added a targeting sensor to the rail cannon pod. A few minor details include adding armor panels to the chest and the upper legs as well as knee joints to the inner and outer leg.

I sculpted the additional engine/power generator on the lower back and added some haevy duty power cables to the rail cannon. The lower set of cables are shoe strings!

Nothing says badass like kill markings and a pin-up girl!


Here is a close up of the details I added to the back. I did a little bit of sculpting for the back of the rail gun and I added the heat vent to her butt.

Purple jewels for the medium lasers and orange jewels for the large lasers.

I added some more cables to the armpits and a pair of search lights by the minigun arrays. I also added the small circular panel to the side just above the miniguns and exhaust vents on the sides of the minigun arrays. I added the rocket covers because I wanted her to have more than the standard 6 missiles that were originally on it. I also drilled some exhaust holes on the arm cannons and added heat vents near the elbows. There is also an armored panel strip on top of the arm cannons.

Close up of the base detail. The rubble was made with pieces of chip board, tree bark, and other random rubble bits.

You can see the upper leg panels I added as well as the knee joints. The base and the feet are covered in dust that I swept out of an industrial laser filter box where I work.

I added some of my 10mm mechs to give you an idea of how big this girl really is. She is going to be a super-heavy for my 10mm forces.
 
 Now get ready for the vehicles. Aaron, hope these better pics blow your mind!
The vehicles are made by Antenocitis Workshop:
http://www.antenocitisworkshop.com/governance-of-technology/g-o-t-vehicles-15mm.html

The battle armor is made by ....well, crap. I don't remember. I think they might be Khurasan Miniatures? If anybody would like to help me with this one, you'll get a gold star!


Three AFV's. I just couldn't resist adding some modifications....
This one came with an anti-tank turret, but it just didn't look right on the AFV. I was thinking of something more like the WWII German armored cars, so I dug through my parts box and found a suitable turret. The turret came off of some MW:DA tank, but the main gun is off a German Tiger and the coax gun is a bit of aluminum tubing. I also had to add some crew stowage.

This one is completely un-modified except for the stowage and radio antenna.

Here I was inspired by our current Striker AFVs. I built the stand off screen armor from scratch using brass tubing, plastic card, and window screen.

Did I mention how damn cool these armored cars are!


A group of hover tanks very reminiscent of the old FASA Centurion tanks. Very cool!

All I did to these guys was add some crew stowage.


Engineering the turrets to be movable was a huge pain! Notice the little nub in the center of the turret? That is a paneling nail that I drilled through the turret and into to the hull. I glued the nail in place on the turret. The turret rings were otherwise incapable of supporting the lop-sided weight of the turret unless they were glued into place. I couldn't stand to glue turrets into a fixed position.


Here is the unidentified battle armor. Once again, I could not leave them completely un-modified...
This one has a support cannon added to the top.

This one got some special effects added.


Hope you all liked the show. Coming soon....more StarWars...in a fleet scale!!


Making up for lost time, so this is going to be a loooong one.....

$
0
0
Alright, I am back with a vengeance! Been slowly chipping away at the projects lined up on my desk while I try to cope with real life. I finally have a few that are worthy of revealing to you, my faithful fans. As you are about to see, i have been all over the spectrum with my projects- a little bit of movie magic, some video game love, battle mechs, air power, and vehicles, oh my! Let's get started, cuz this is going to be a loooong post. I owe you guys ( and gals ) some eye candy.


Here are a couple of F-Toys 1/144 scale AT-ATs. You've seen the standard one before....
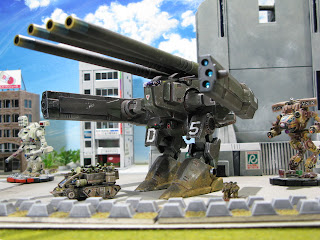
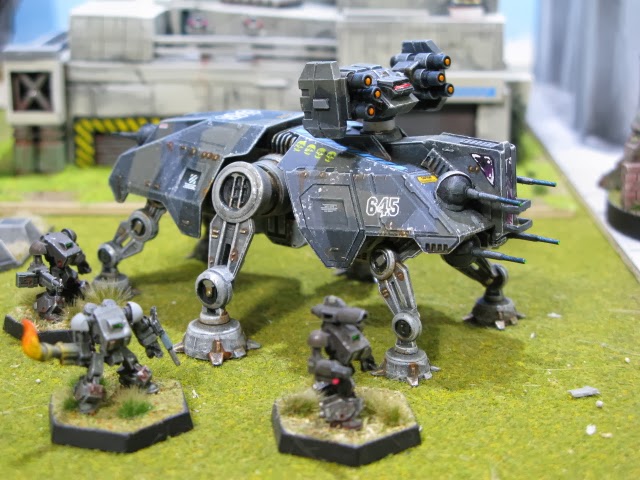
...Now behold the new Imperial upgrade! The heavy assault AT-AT!

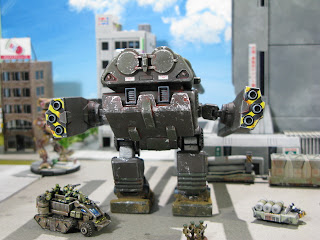
Pesky rebel speeders bothering you? Swat them down with a pair of radar-guided quad blasters mounted on top of the hull for maximum effect. The anti-air turret is made with a combination of MW:DA parts.

A little bit of side art.


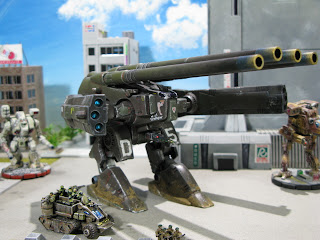
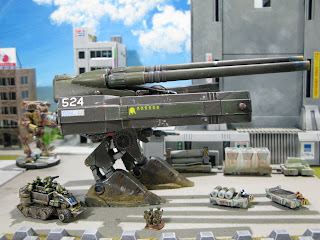
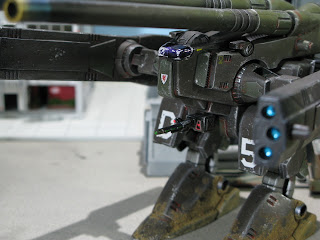
The troop carrying capacity has been replaced with  massive power cores to supply the dual turbo lasers mounted on either side. Mounted on turret assemblies, the turbo lasers are capable of firing in a 270deg. arc with a 90deg no-fire zone around the feet. The reasons should be obvious. The turbo laser turrets are the booster engines from a Macross VF-11c Valkyrie. The turret rings are tires from a 1/72 scale German half track. I wanted the upgrades to look like they belong there and not just glued on.

Yet another F-toys 1/144 scale AT-ST walking along with a MW Uller. Both have been "upgraded".

The Empire decided to add some heavier firepower in case they encountered anything repulsive and furry. I'm not sure where the 50cal came from, but I realized it had no ammo box. I wanted an ammo belt to feed directly into the hull, so I used a small piece of a zip tie. At this scale I figure this to be more like a 20mm or 37mm autocannon.

This upgrade is a modern grenade launcher turned side-ways.


I was trying to show off the snowy base with footprints and snow stuck to the bottom of the lifted foot. I should've added a dead rebel.

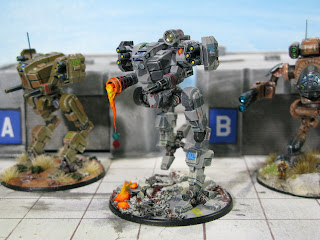
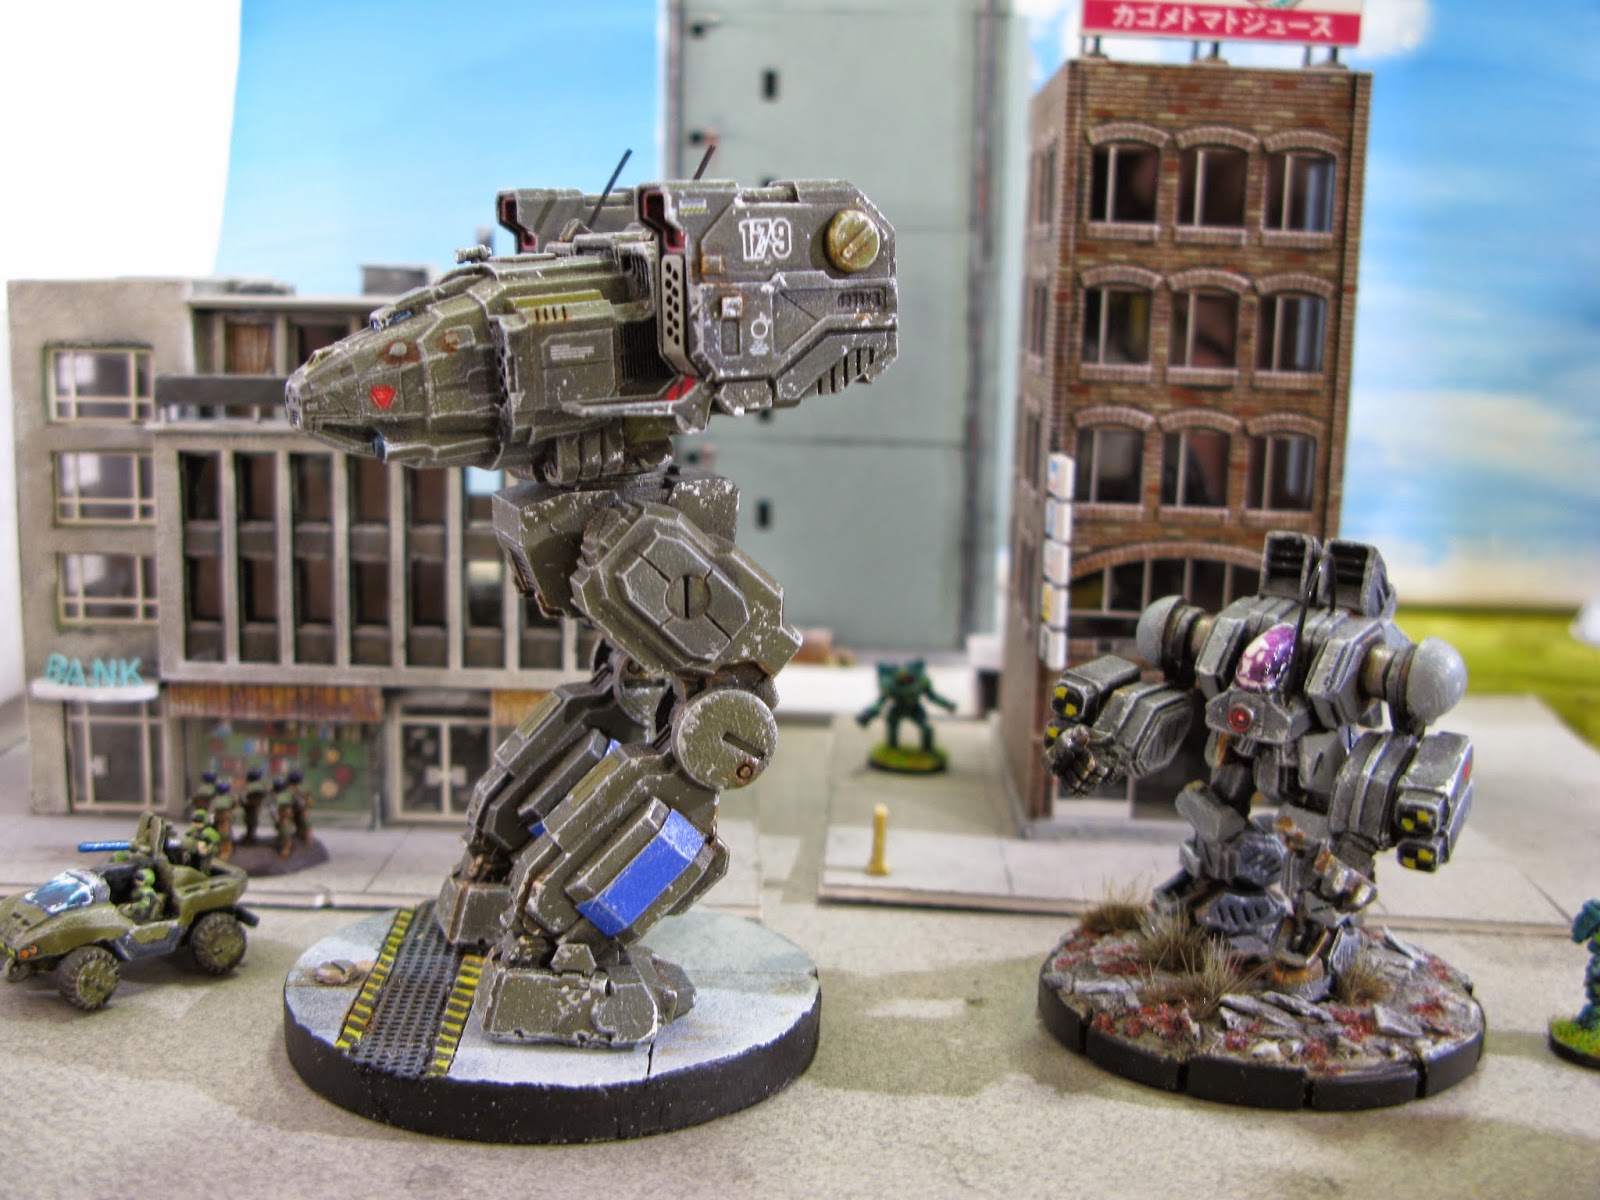
Here is a MW:DA Uller with a few upgrades.

I altered the stance to put her in more into motion. Then I severely altered the left arm to turn it into a PPC.

Add caption

The altered left arm. I just cut some stock plastic tube to make a new gun barrel and drilled holes in the original forearm to make it look like a cooling jacket.

I also modified the right arm cannon by just making a new barrel.


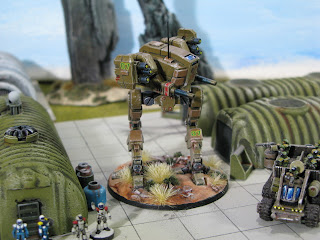
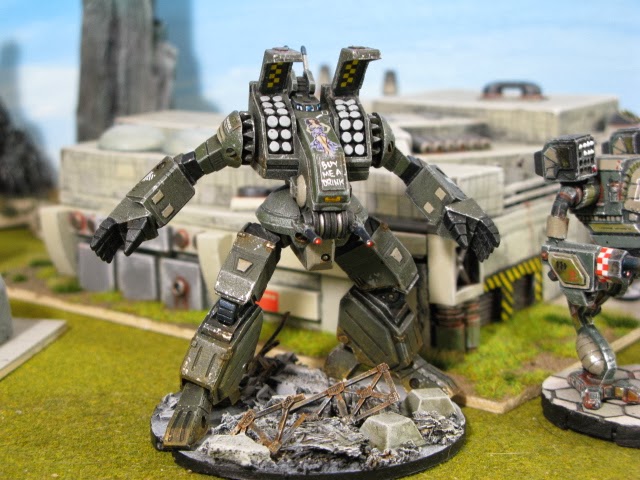
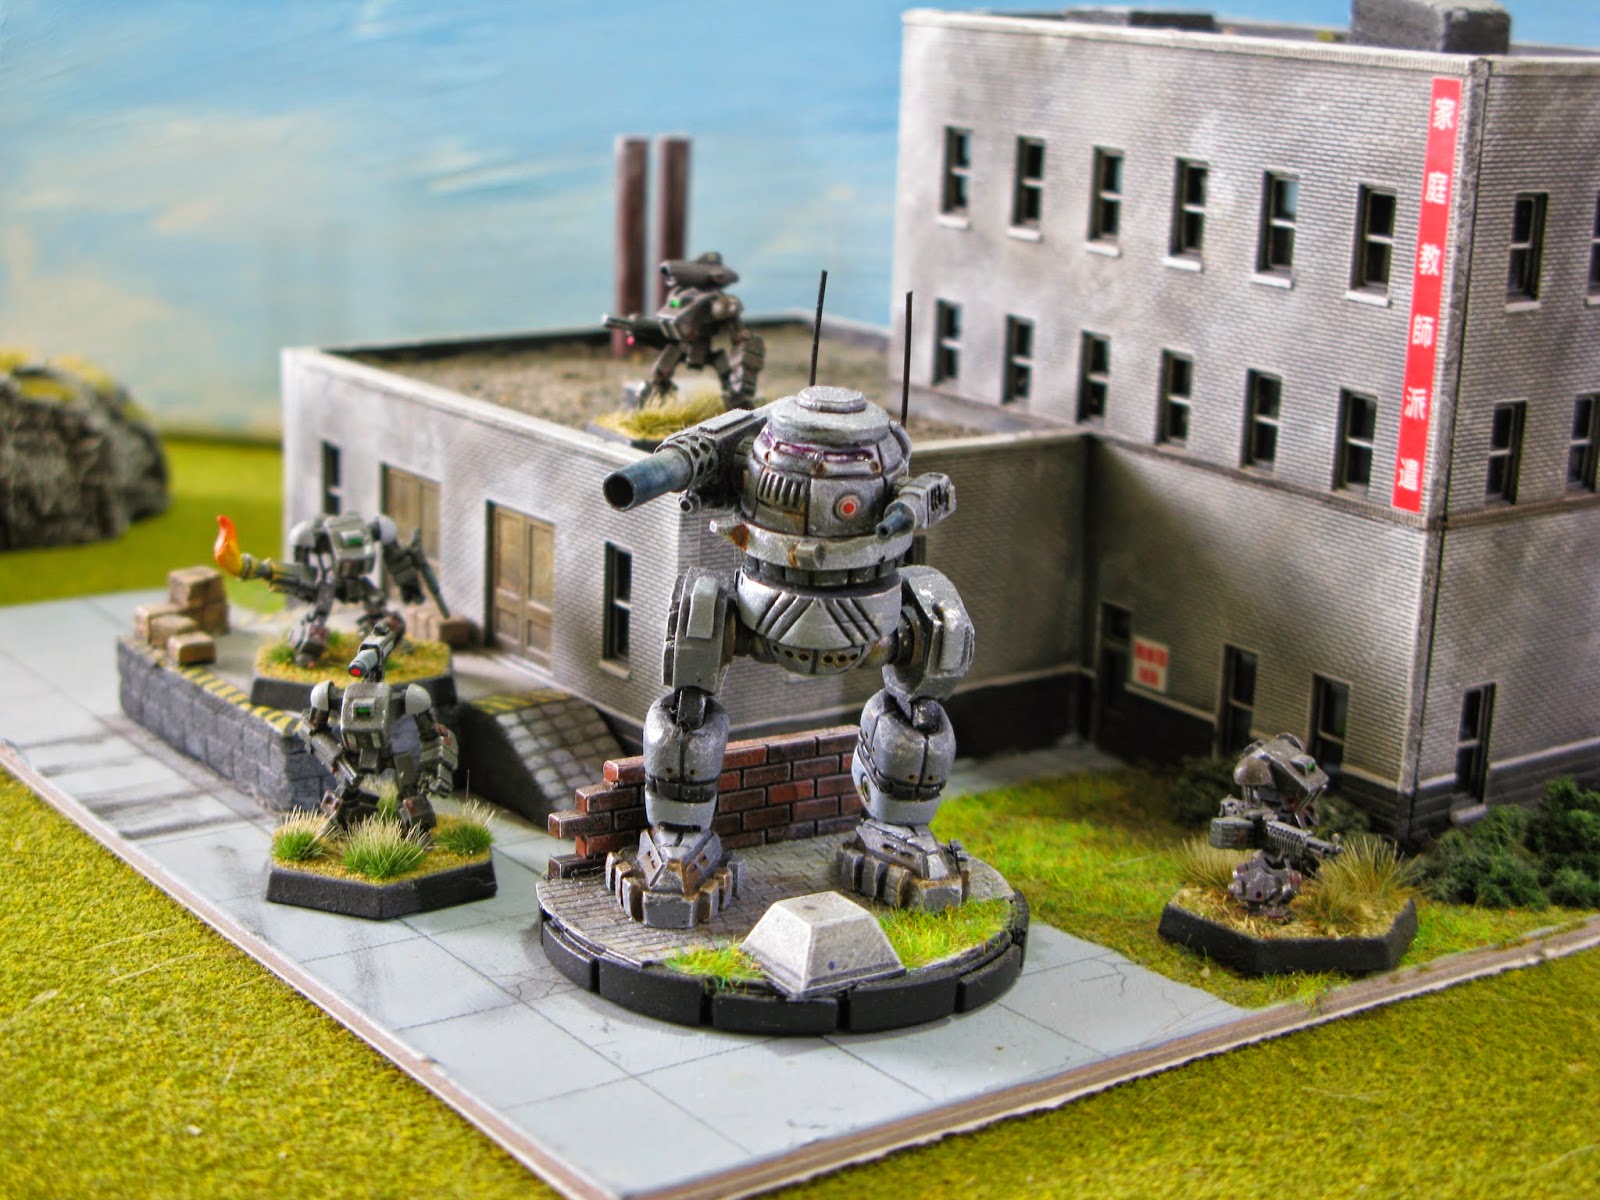
This is a modified MW:DA Hatchetman....Really modified. The things I hated the most about the original mini were the static pose, no resemblance to the TRO stats, and the wimpy hatchet. I removed the arms and legs and sculpted some new shoulder and hip joints. Then I cut the legs apart at the knees and sculpted some new knee joints. I also twisted the ankles around to fit the new pose properly. I then put them all back together in a more aggressive pose.

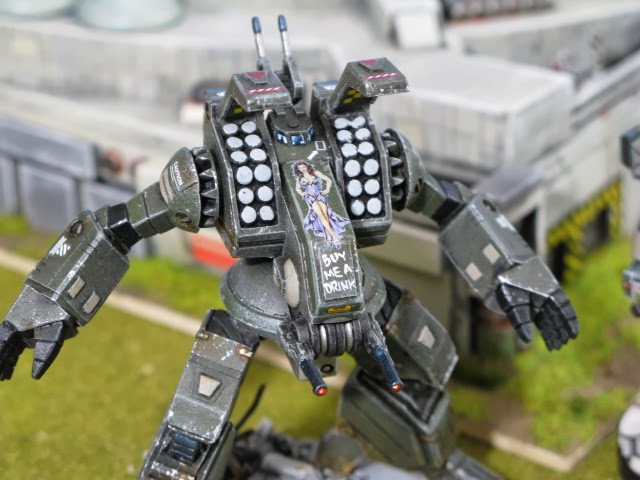
The new hatchet has a beefier handle that looks more suited for mech chopping. I kept the original axe head.
You can see the new autocannon I sculpted tucked under the right armpit. I also realized that I hated the look of the left arm cannons, so I hacked off the crappy gun barrels and made new ones out of brass tubing. I also went with a city-themed base, which is where I would primarily deploy this mech.

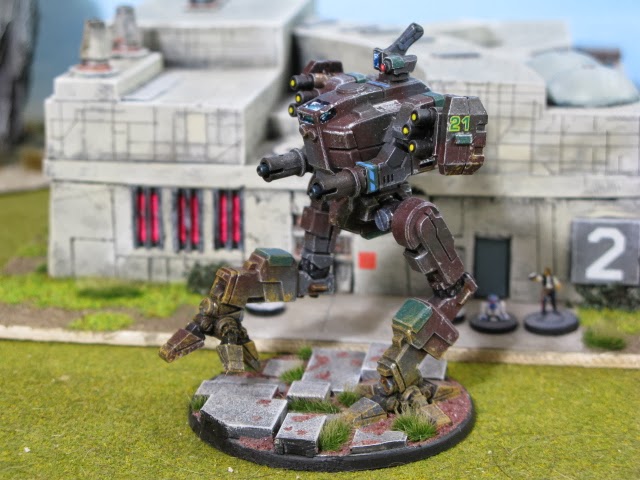
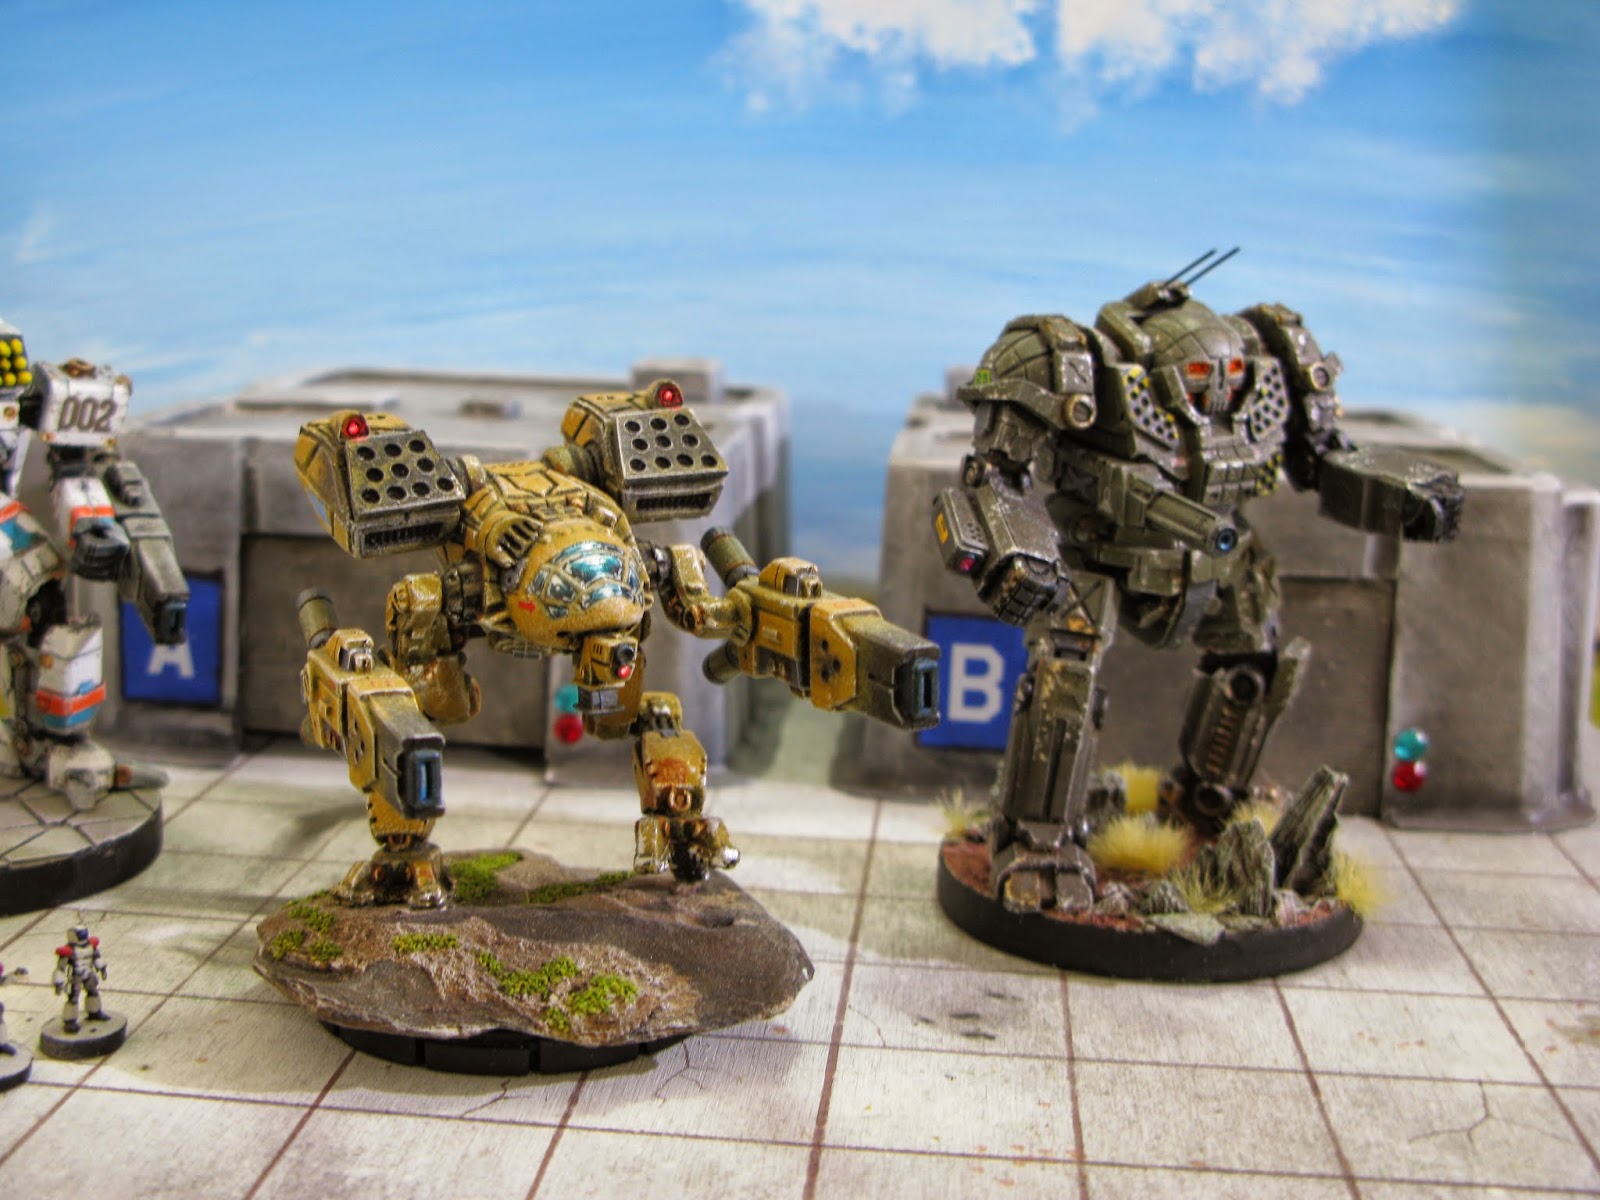
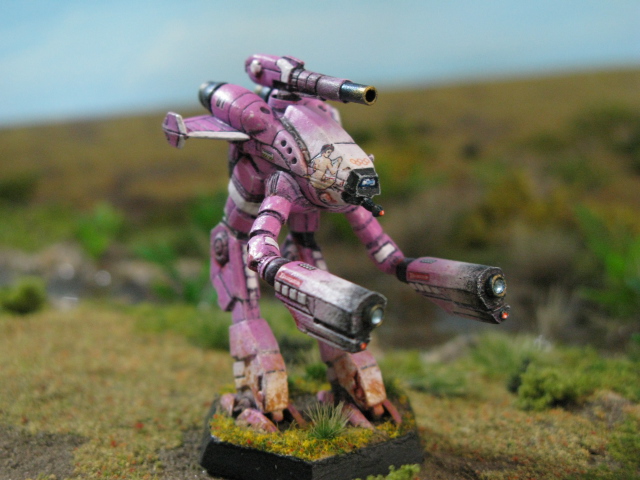
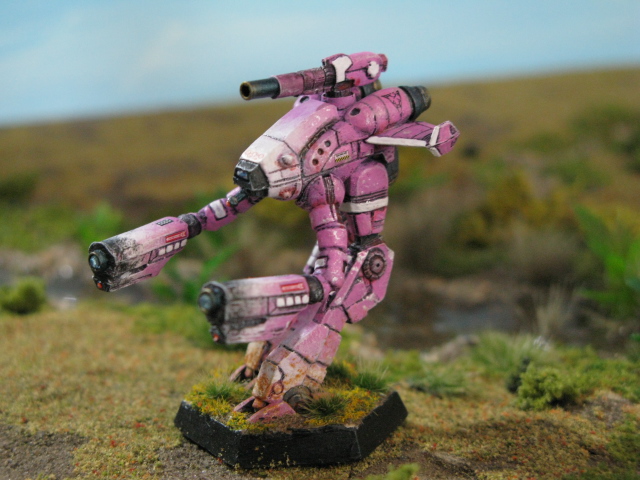
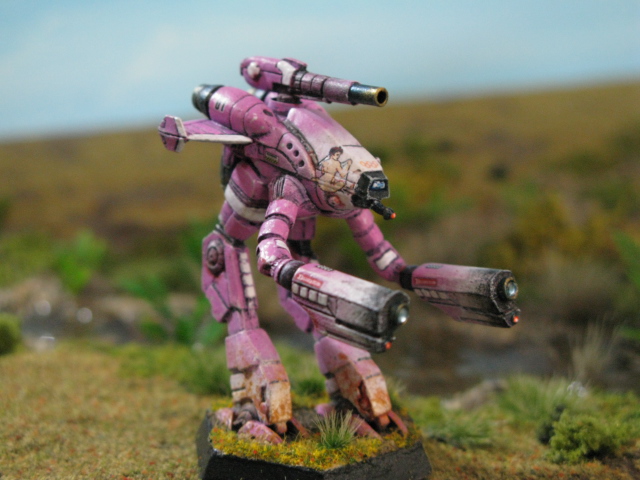
There are so many Madcats....and I love them all! I believe this one is the Madcat III. As a lighter mech, I didn't think the original missile launchers looked right- too many missiles for such a little girl! I sculpted a pair of SRM6 launch tubes and just glued them over the old missile ports.


Again, I wanted to create a more dynamic pose with a little something extra on the base. I left the left leg intact while I hacked the right leg at the hip, knee, and ankle and reset them to fit on the cool base I made for her.

The battle damaged tank was created by Dremeling the shit out of an old MW:DA tank. Red tanks always die, just like red shirts.

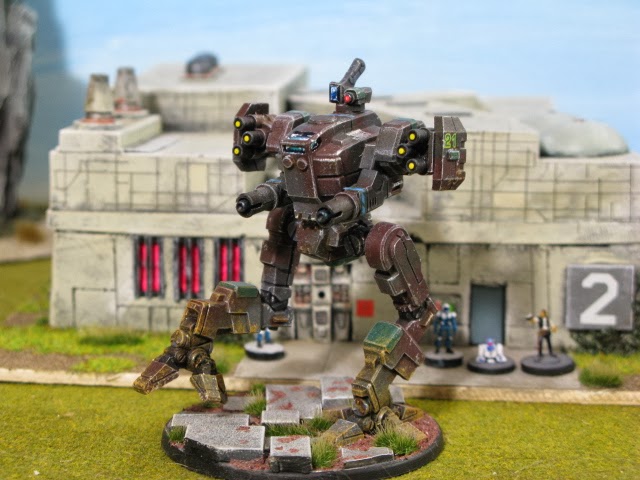
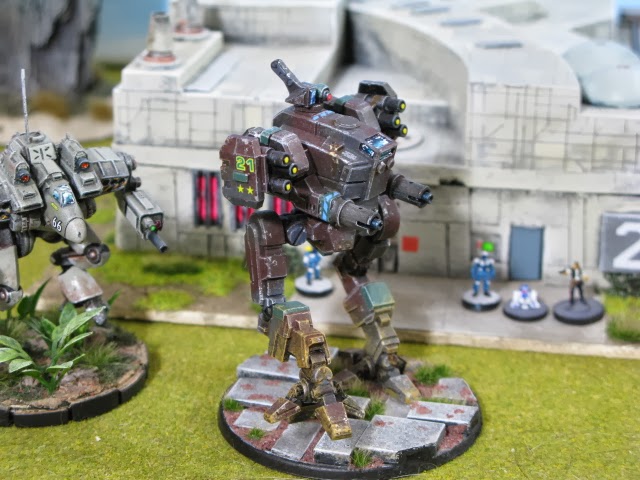
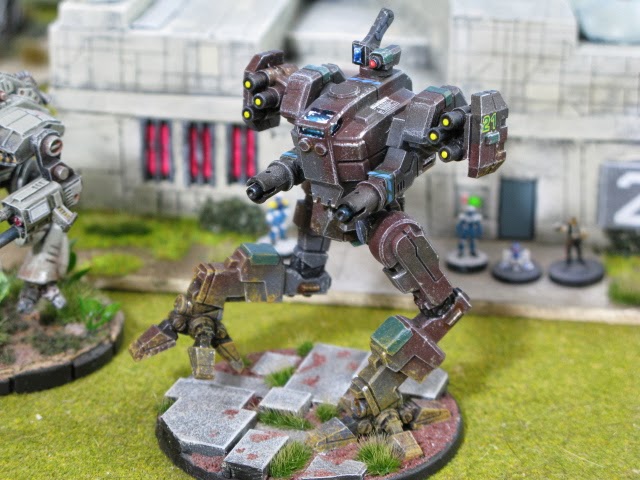
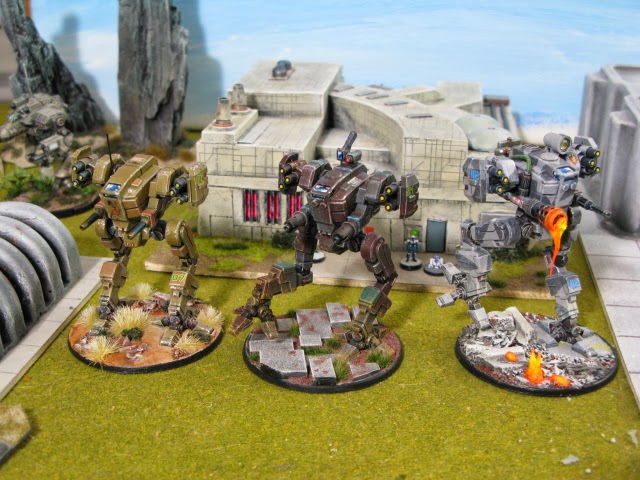
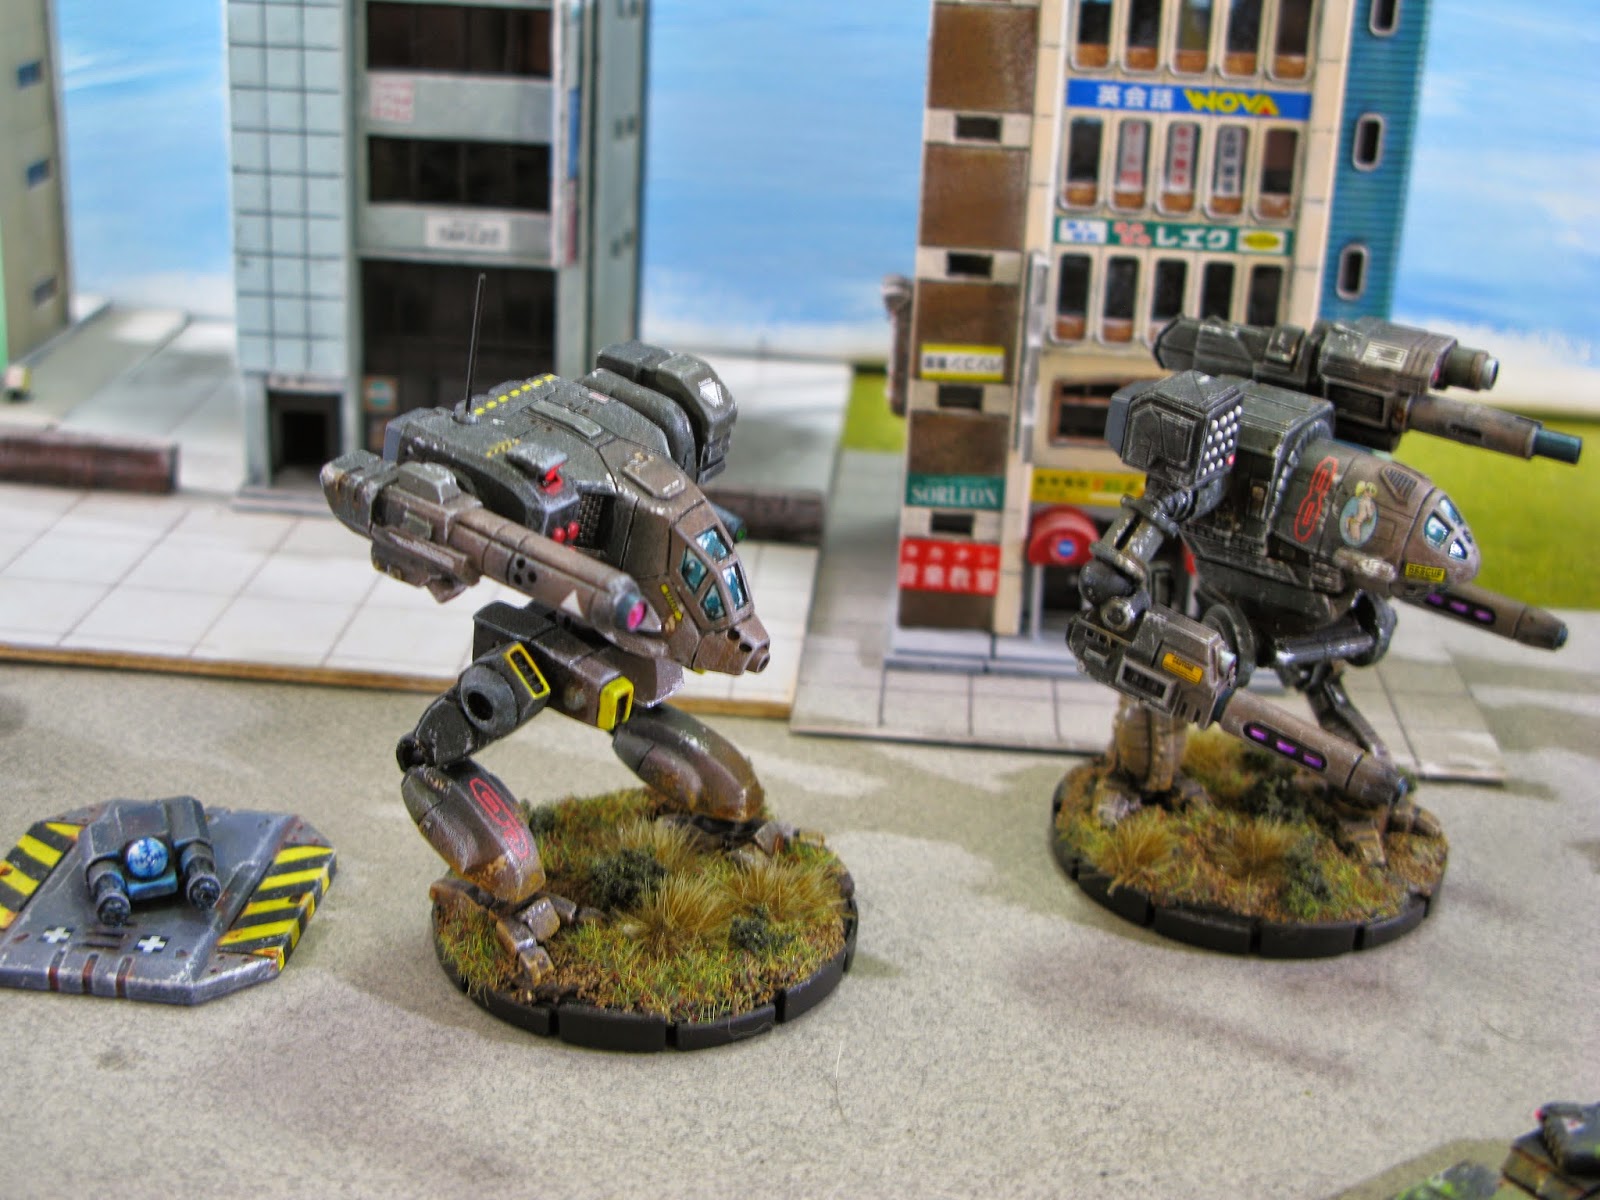
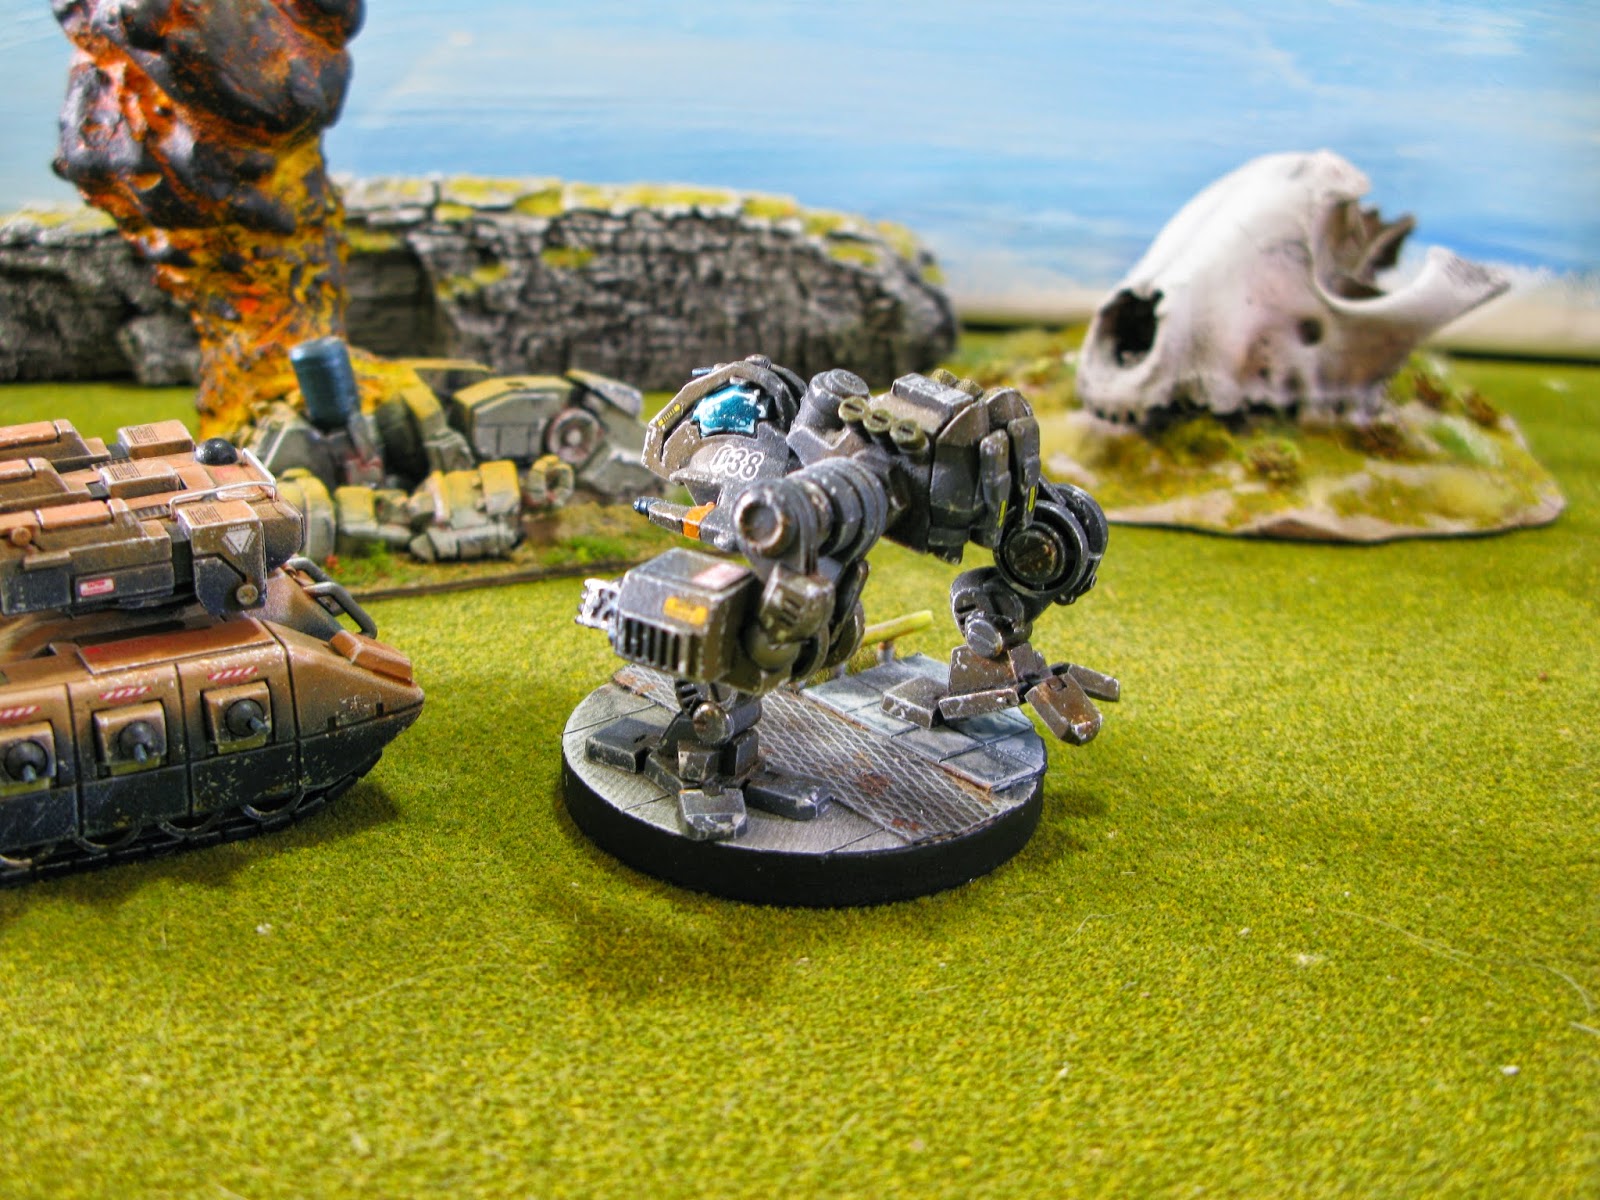
Another MW:DA Madcat slightly modified.

The dragon teeth are made out of rubber feet that you would put on the bottom of stereo equipment or table lamps.

You can see the heat vents I added to the back of the arm pods and the missile launchers.

I put beefier gun barrels on the arm pods and added an armored collar to the arm where it connects to the gun pods. The base was just a strange idea I had.

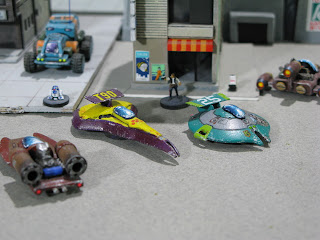
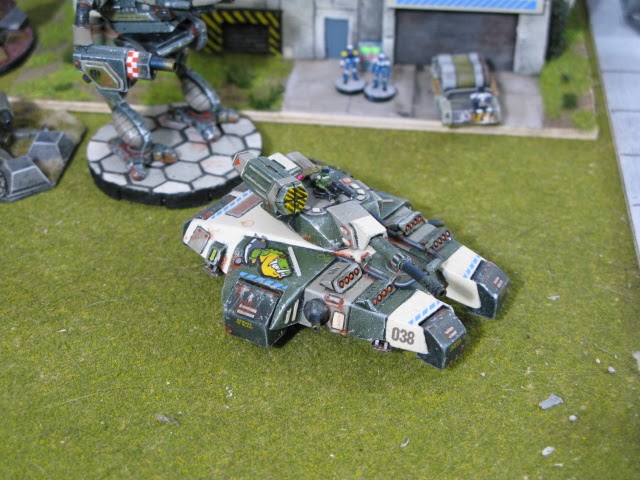
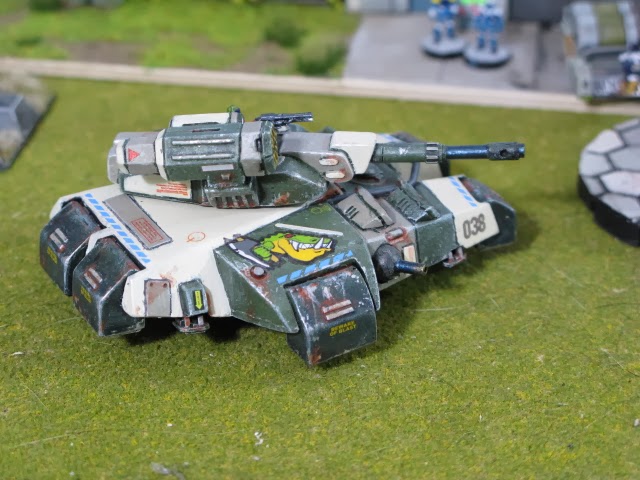
This is a Heavy Gear hover tank that I recently re-painted because I was unhappy with the old job.

Once again, I could not leave this tank in stock condition. I added the commander and his MG as well as the stowage on the turret. I also decided that a tank this large should have more weapons. I sculpted the four rocket pods on the hull and the ball turrets on either side of the hull.


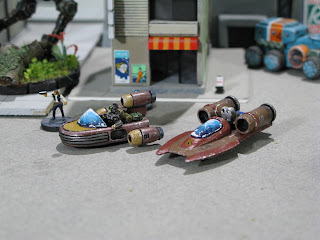
The missile launcher is a spare part from an Armored Core mini. I had to sculpt an attachment to the tank turret so it would fit better. I HATE the "glued-on" look.

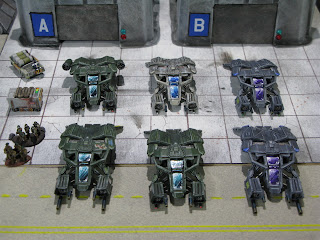
A collection of Heavy Gear tanks. Of course I modified them! I think I should also mention the big generators in the background are made from an emptied Girl Scout cookie tray. i poured hydrocal plaster into the cookie tray, and with a few cosmetic enhancements- Viola!!!!

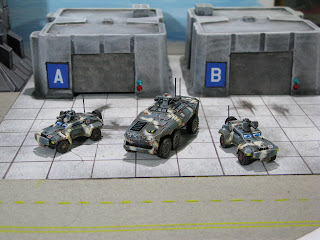
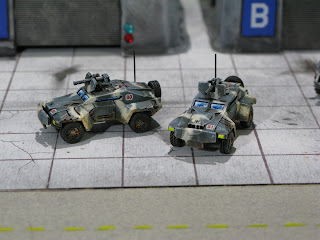
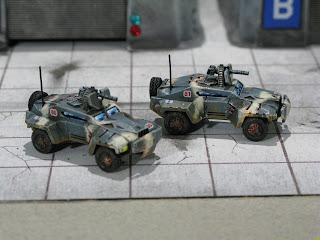
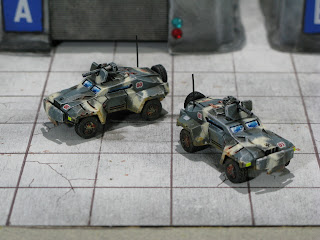
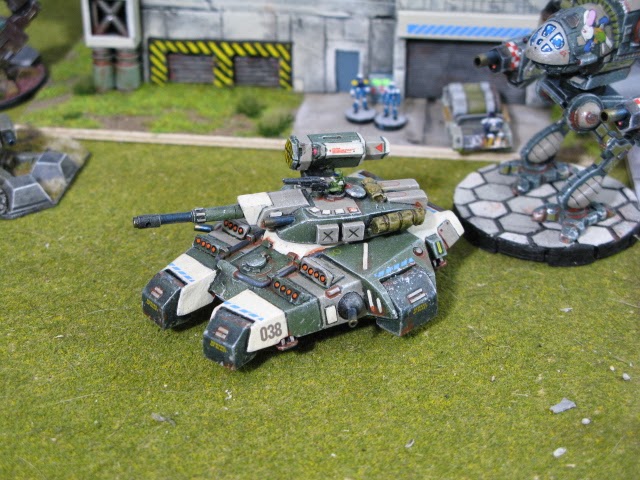
These are called Aller MBTs. I completely redid the cannons by sculpting muzzle brakes and making new barrels from brass tubing and parts. I sculpted the coaxial searchlights.

Then I thought the tanks need a little something in the front so I created some front armor using plastic card and spare tank treads. Then I added the missile pods and the access hatch right below the launcher. I also added the hatches on the sides of the turret.

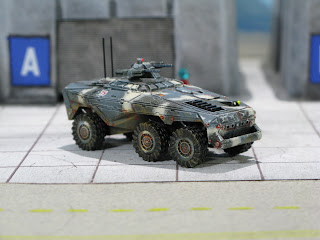
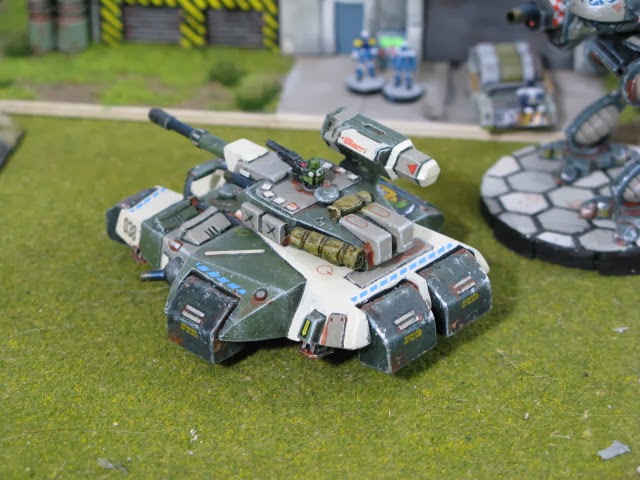
This is a Visigoth MBT. Again, I removed the old barrel and replaced it with something bigger- just a simple piece of plastic tube. For this tank, I was thinking PPC for the main cannon.

I added the small anti-personnel turret to the front of the hull and the commander's MG to the top of the turret. I also added some armor plating to the top of the hull using plastic card stock. The plate behind the anti-personnel turret and the plates directly behind the hull missile pods are my additions. Finally, I also added the vent on the top of the forward hull.


A modified MW:DA Locust. Not much done here except for a slight re-pose and some cosmetic alterations.

I hated the look of the original cockpit, so I altered it with my Dremel and some plastic bits. The base is tree bark painted to look like stone.

I cut off the left leg and bent the toes to re-pose her in a walking stance.

I drilled holes in the "arm" guns to look more like cooling jackets and replaced the chin cannon with something a bit more durable, namely a brass tube. the ammo belts are bits of zip ties- an idea that I am quite proud of, by the way!

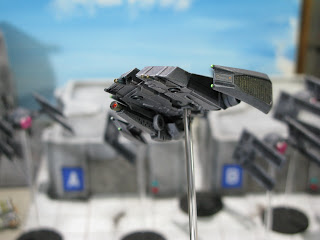
And now for some air power. Here is a 1/144 scale VF-11c Valkyrie by Bandai. Nope, It isn't stock. I also got a bunch of 1/144 scale ground crew.

I added small gun pods by the cockpit and some formidable under-belly weaponry.

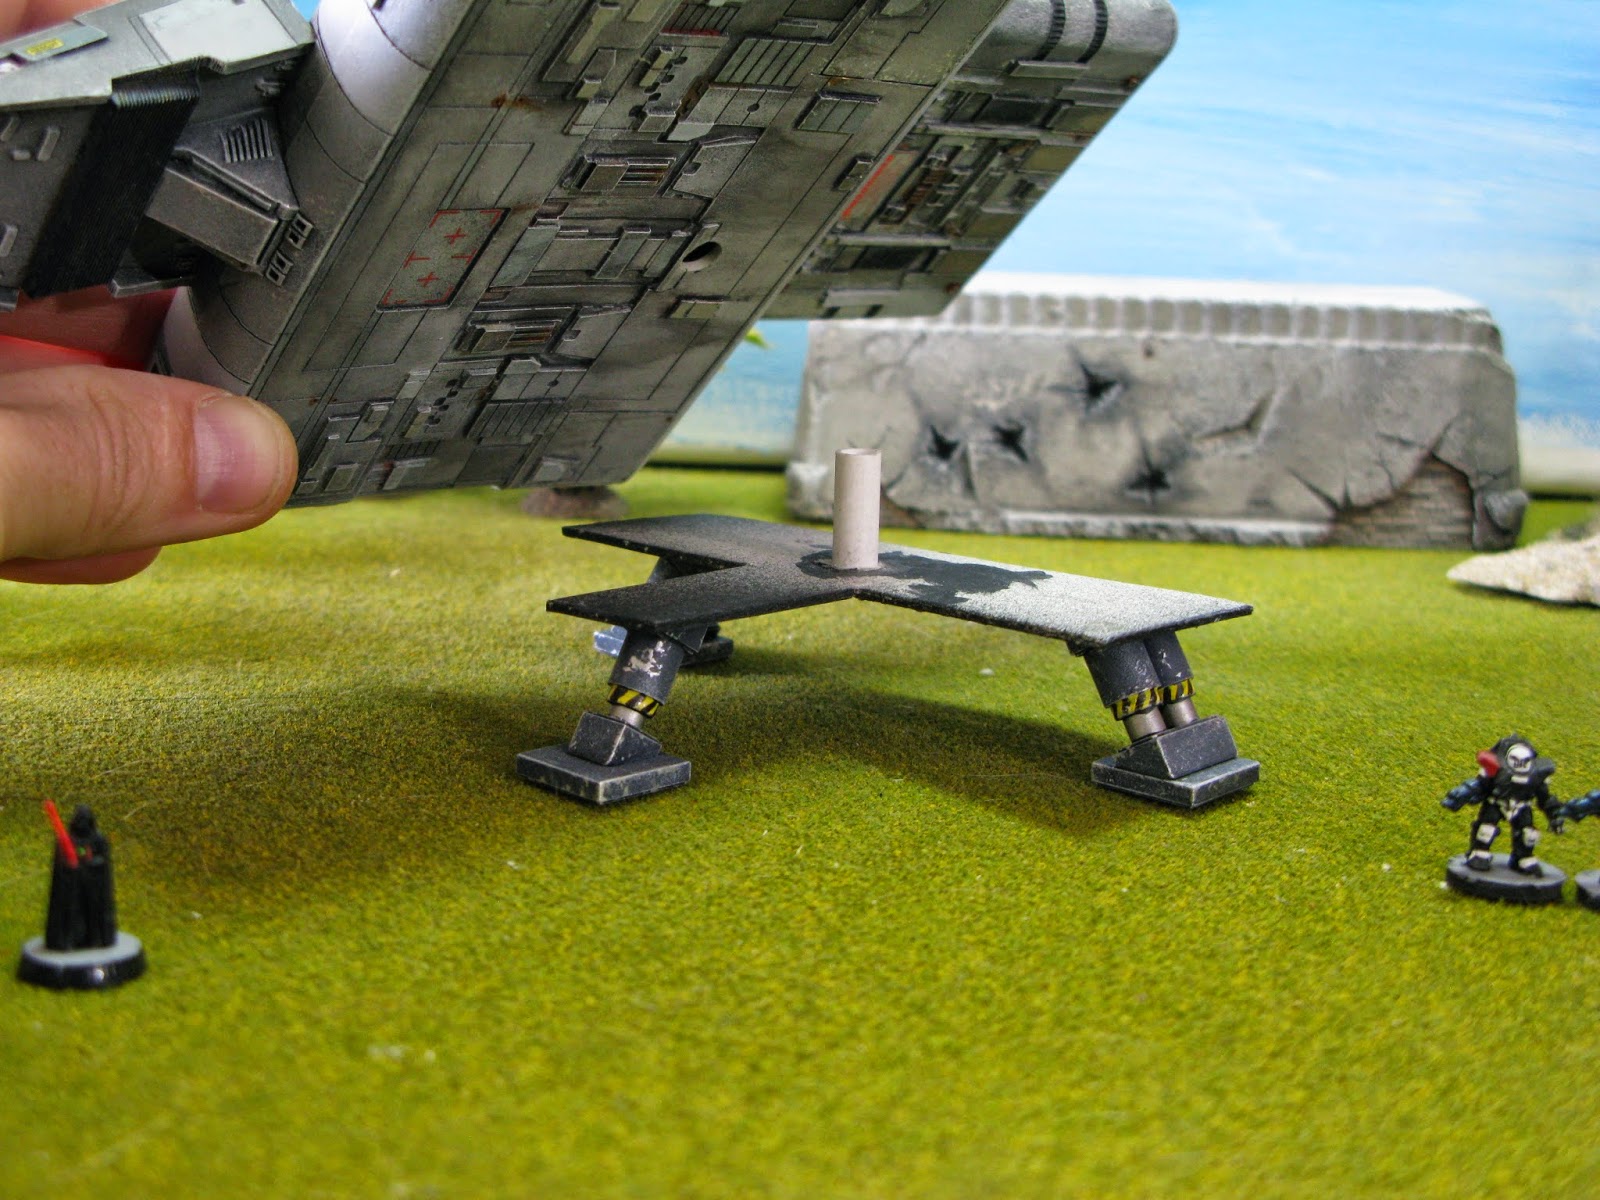
This is just to show off a brilliant idea I had for showing off aircraft. I built a temporary cradle using the landing gear. This way I can display it on the ground or in flight!

The gattling cannons are spare MW:DA parts and the missiles are spare parts from my 1/144 "Aliens" dropship. I had to make the missile hard points using plastic card.

The afterburners are painted with florescent paints, not photoshop.

I had to fill in the landing gear bays using wood putty and I added the intake fans.

A little bit of pilot art behind the cockpit!

This is a 1/144 scale Fire Valkyrie by Bandai.

Again, I had to add some weaponry and pilot art. I thought some tribal art would look cool on her body. I added some protruding gun barrels to the sides in front of the wings.

Turn and burn!

I added some air-to-air missiles, intake fans, and filled in the landing gear bays.


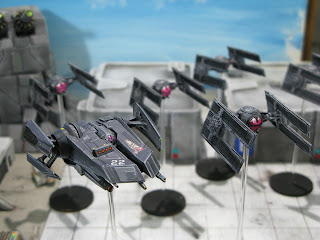
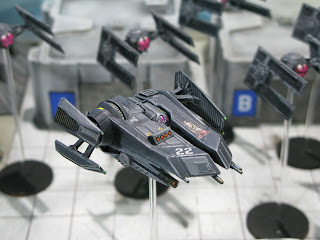
A pair of 1/144 scale TIE fighters from F-Toys.

I wanted to do something REALLY different here. How about a pair of Armorcast cinematic effects? Again, that glow is NOT Photoshop. That is florescent paint.


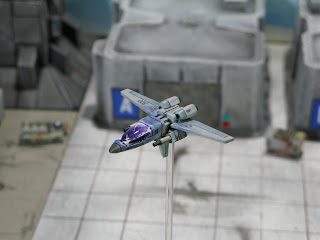
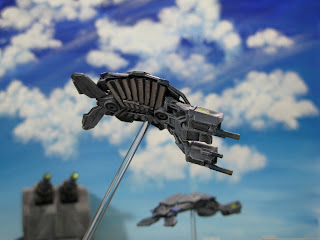
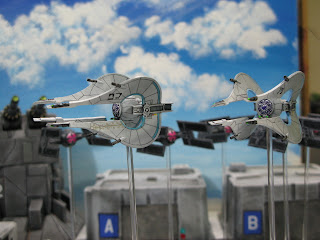
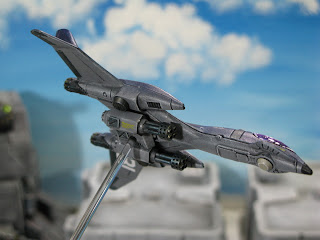
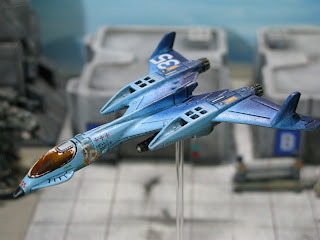
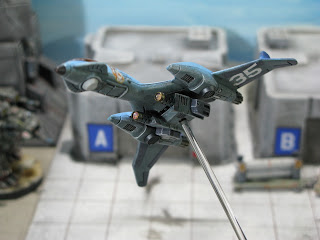
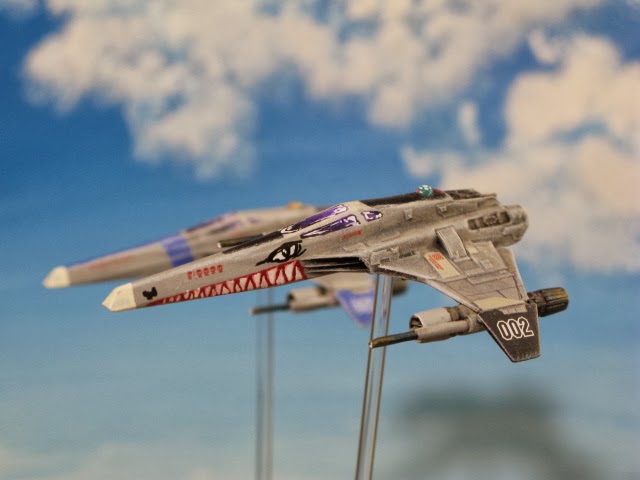
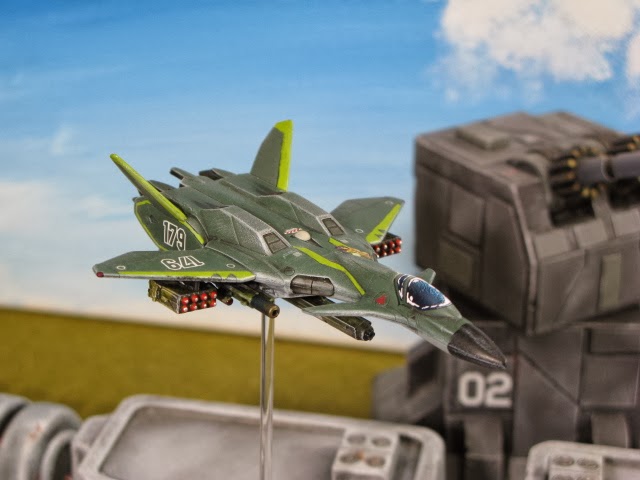
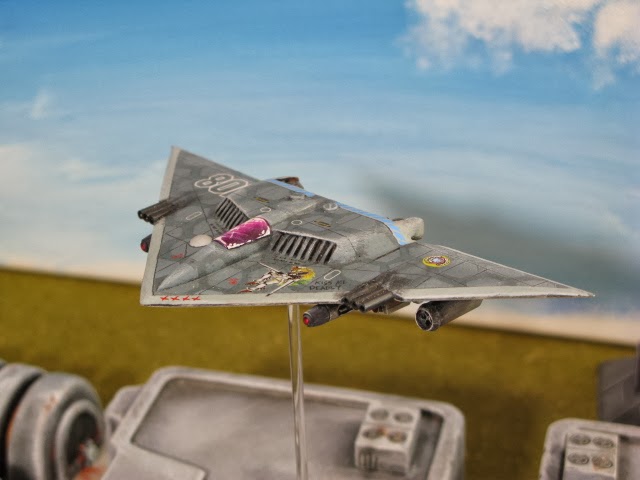
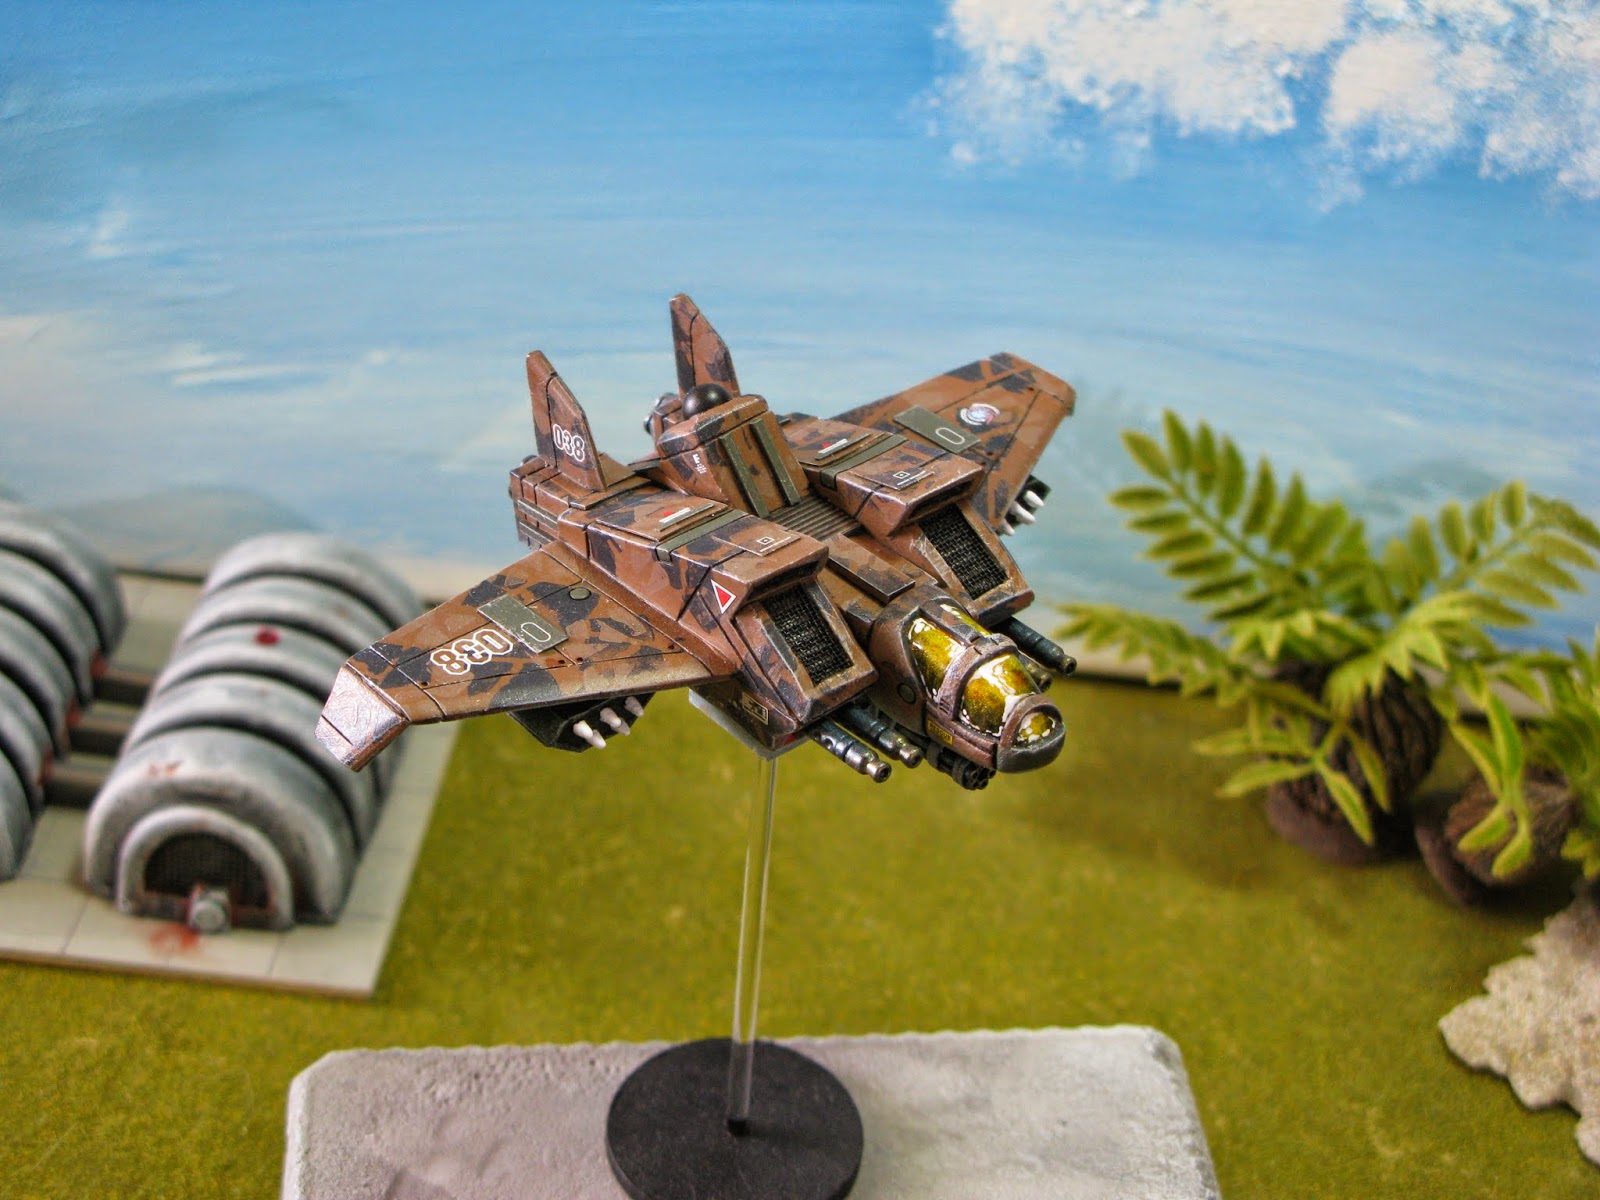
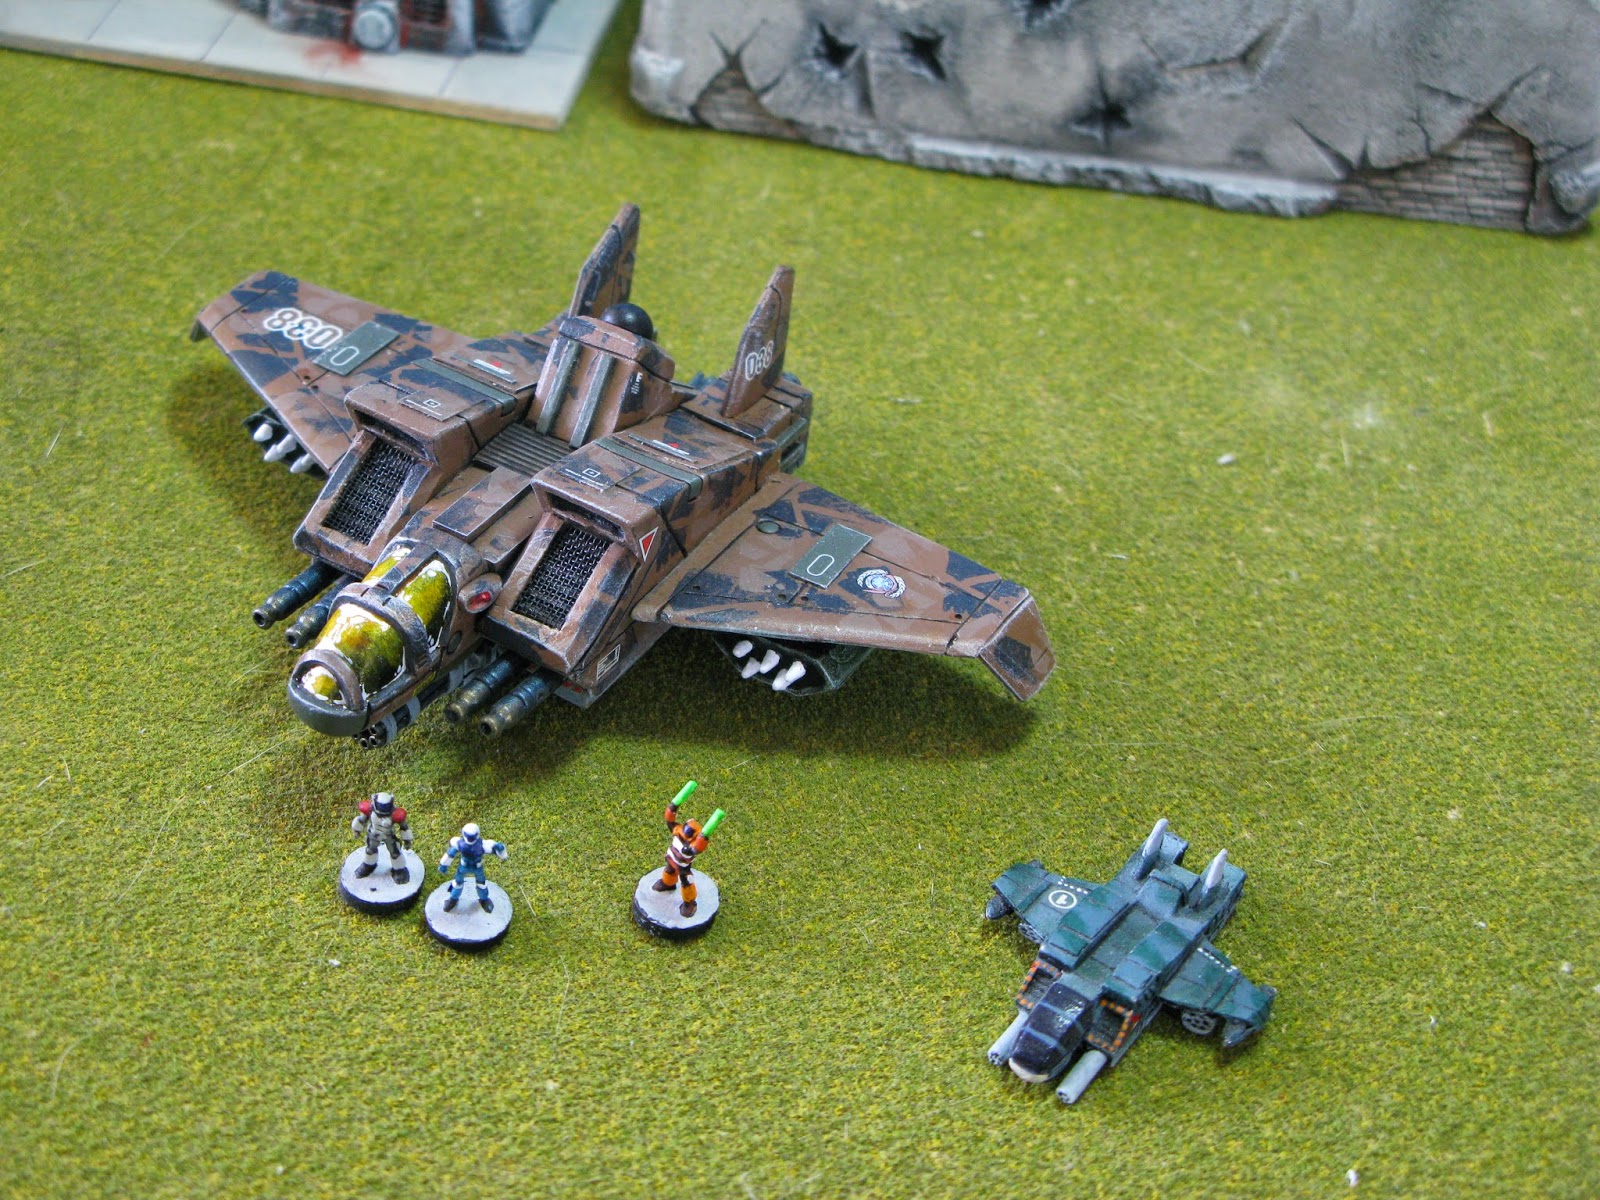
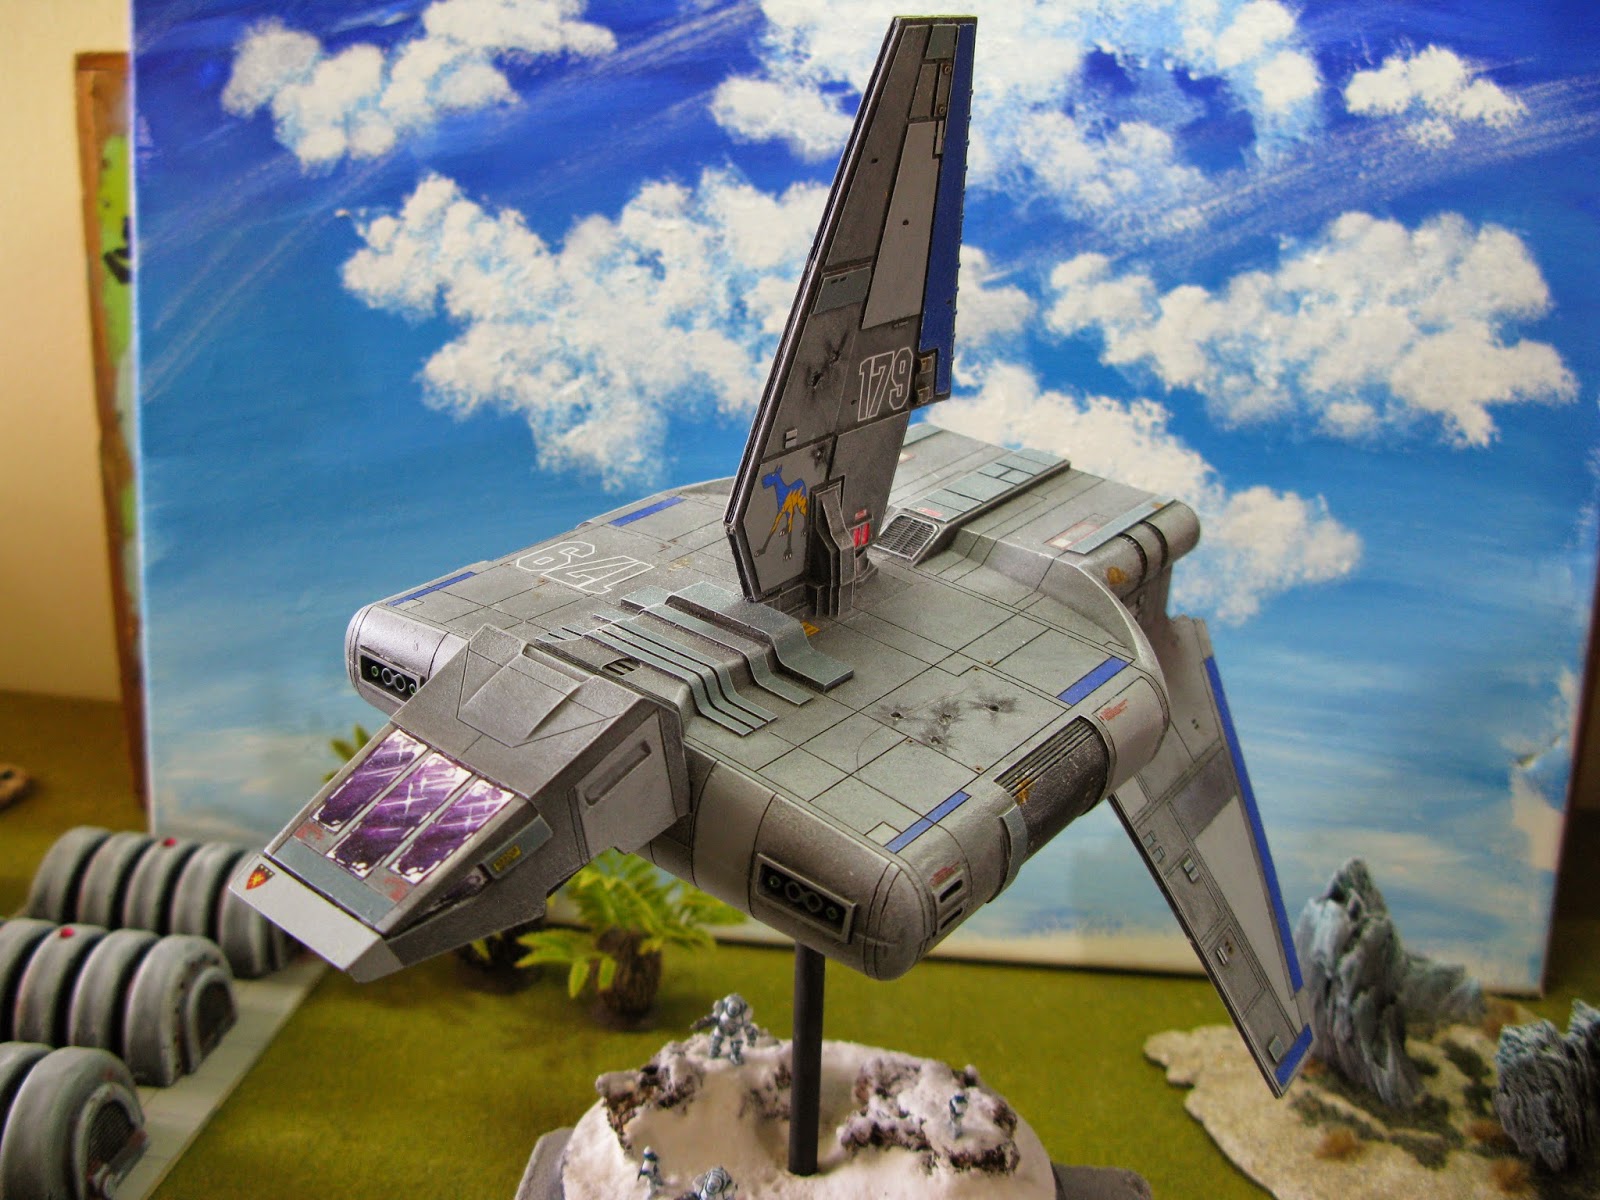
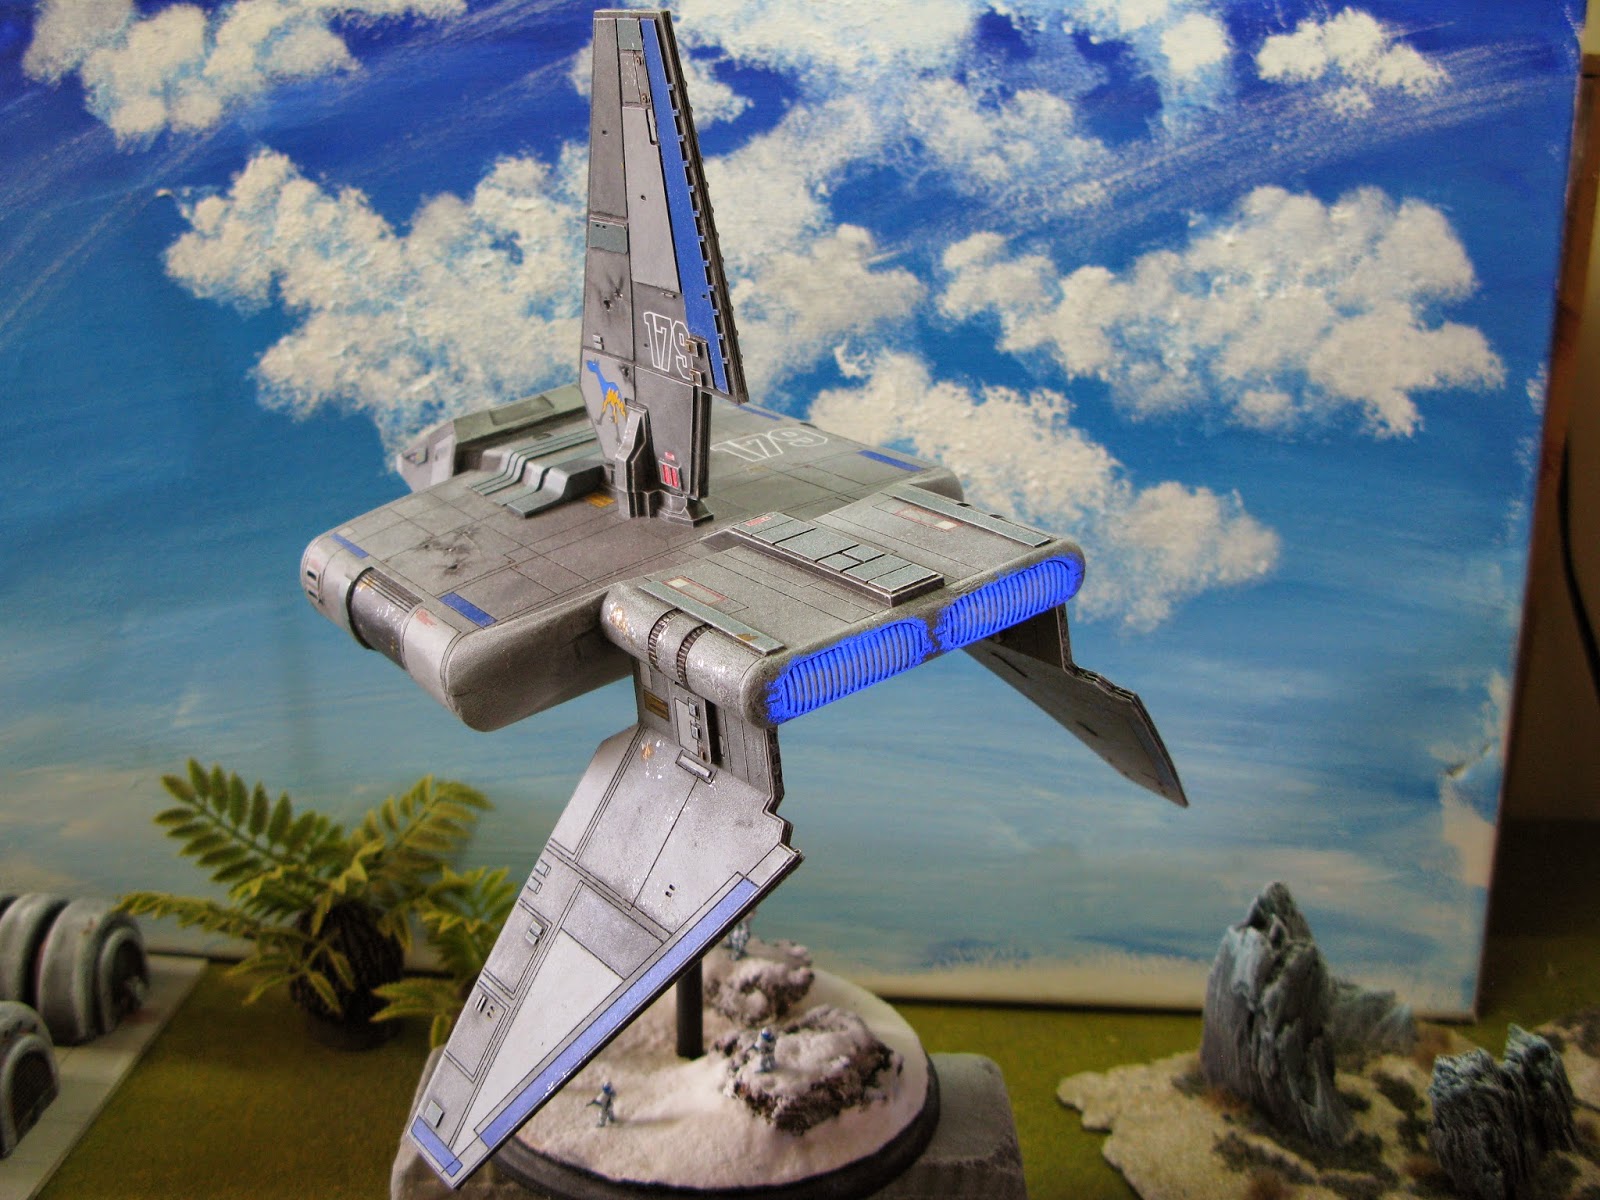
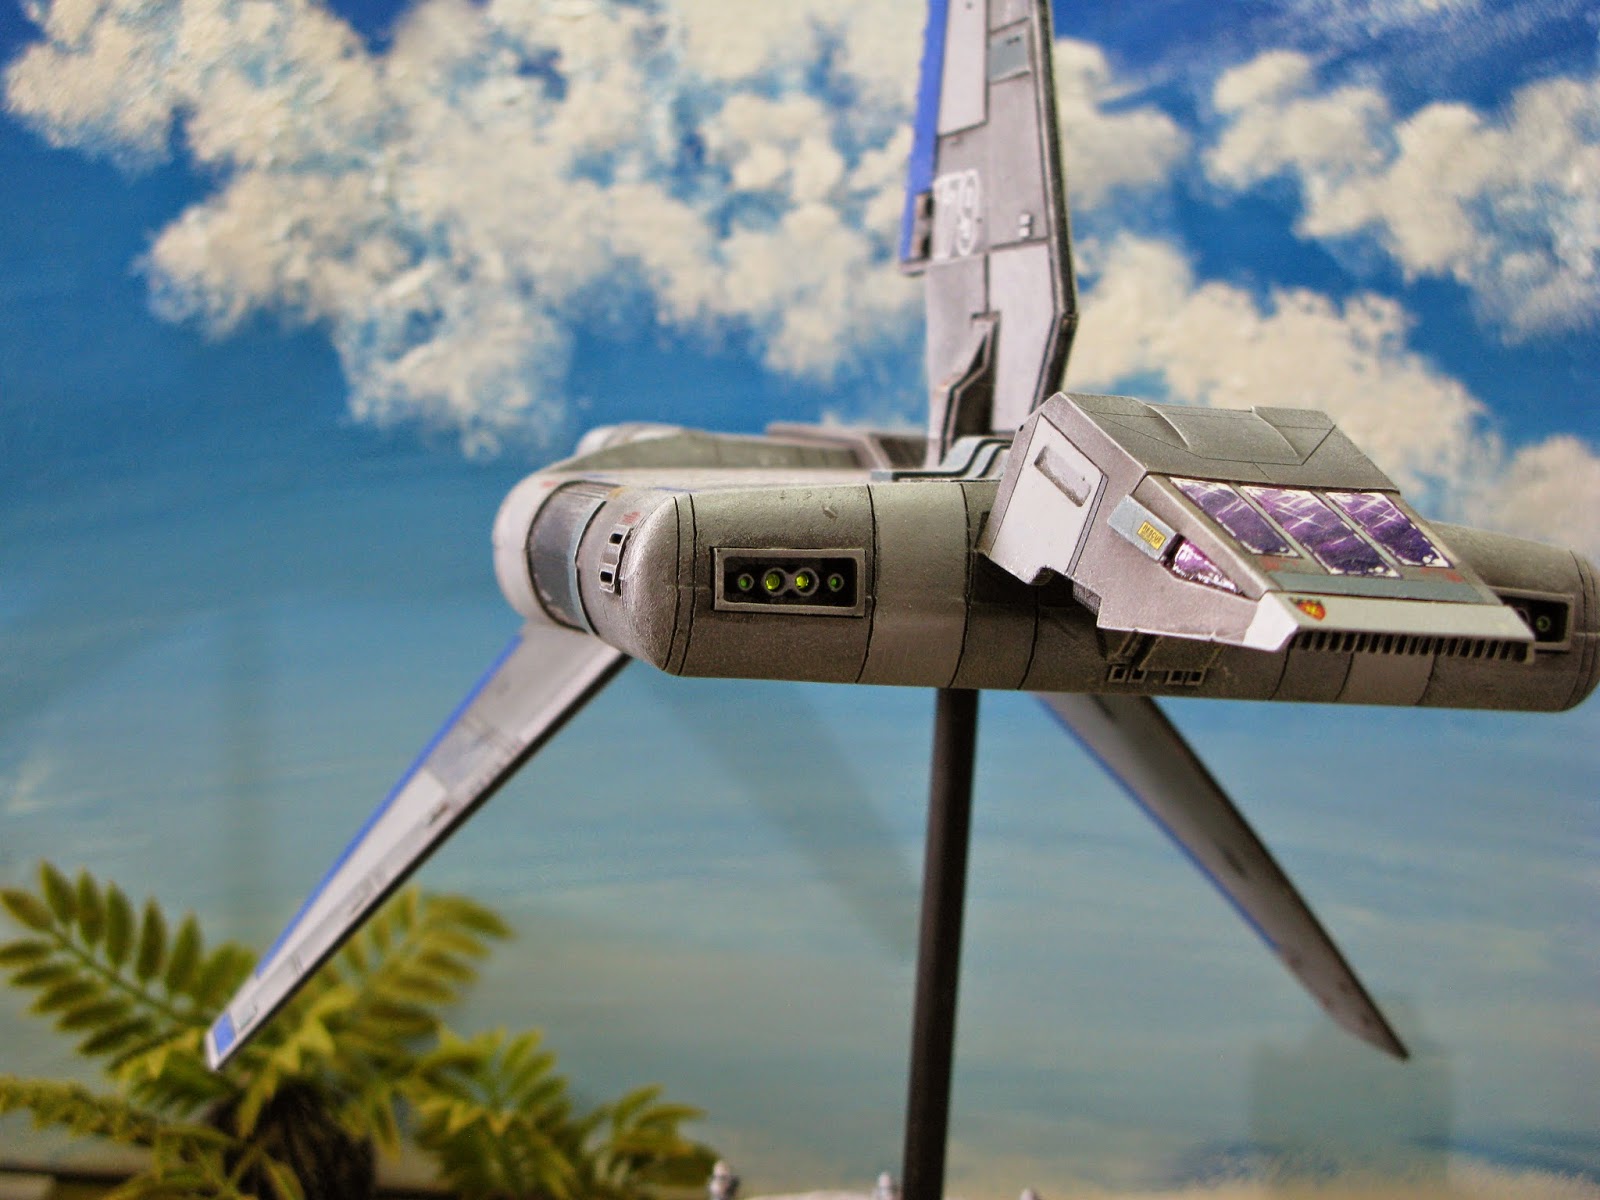
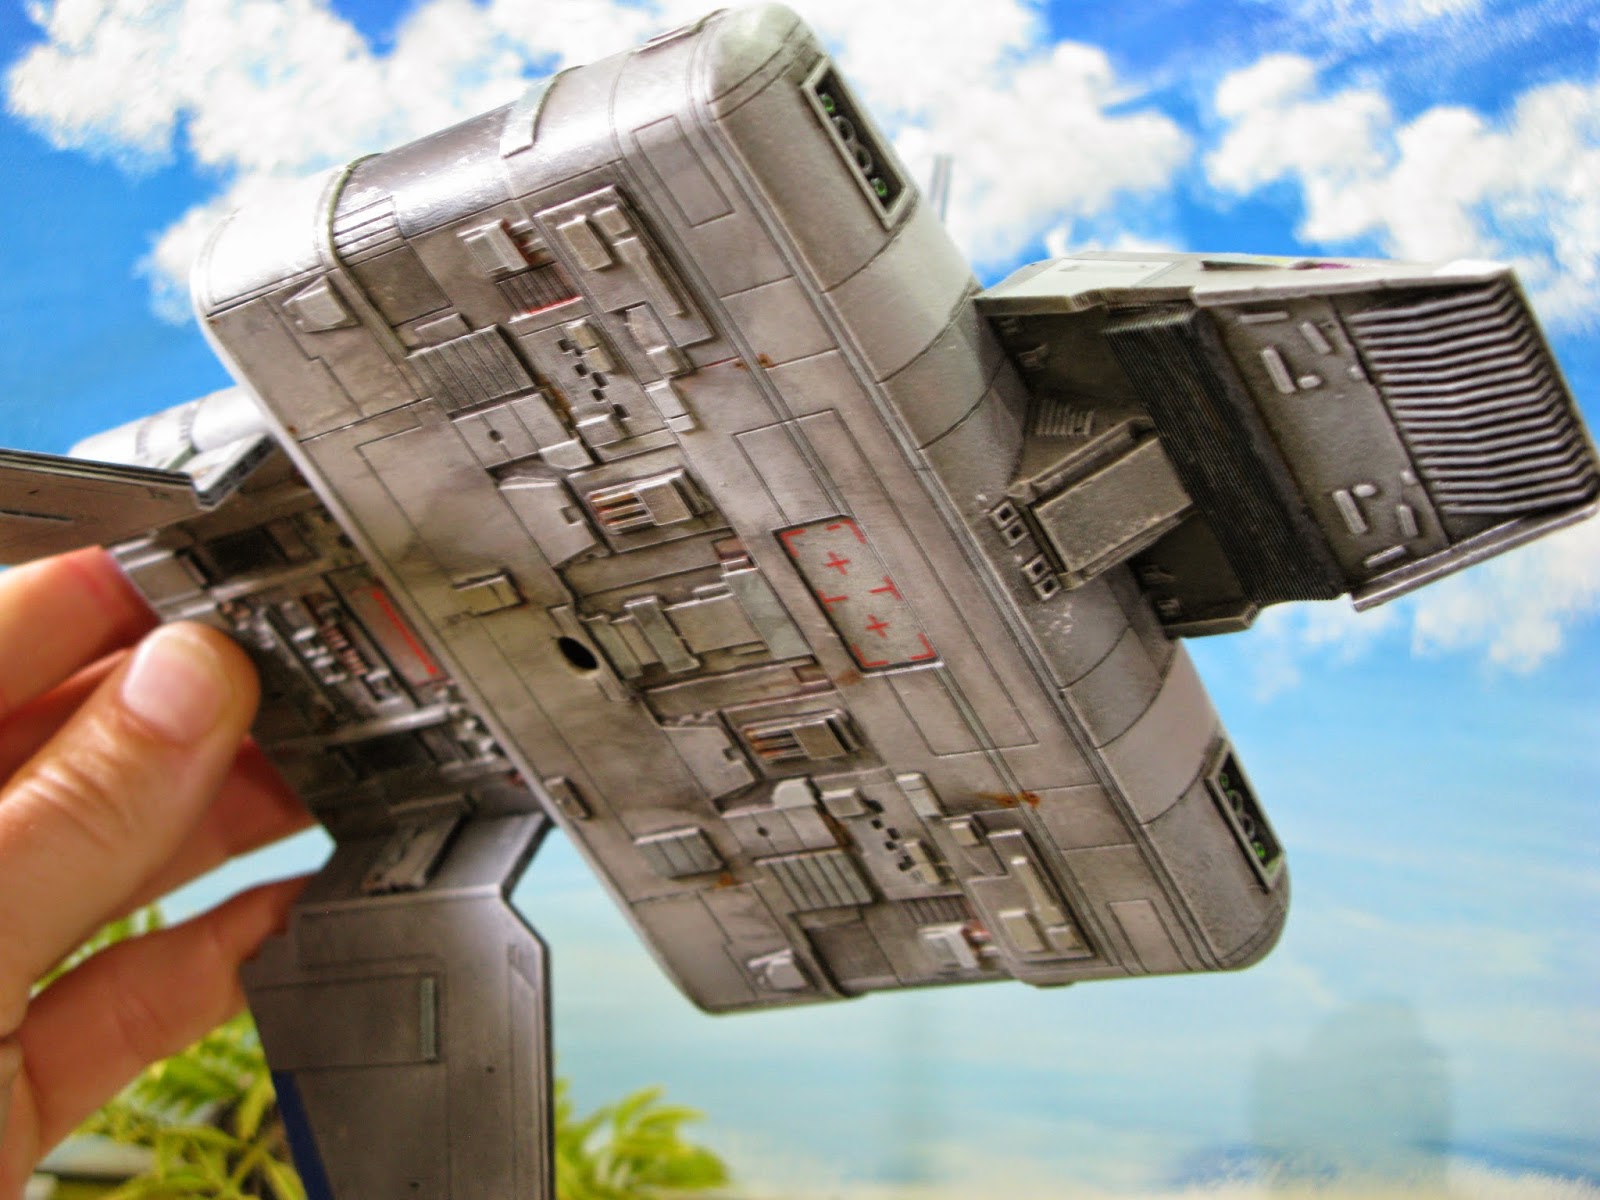
Here is a jet from a an anime show (?) Superslyph Yukikaze?? I am not familiar with it at all, but when I saw these 1/144 scale kits on Hobby Link Japan, I figured what the hell?

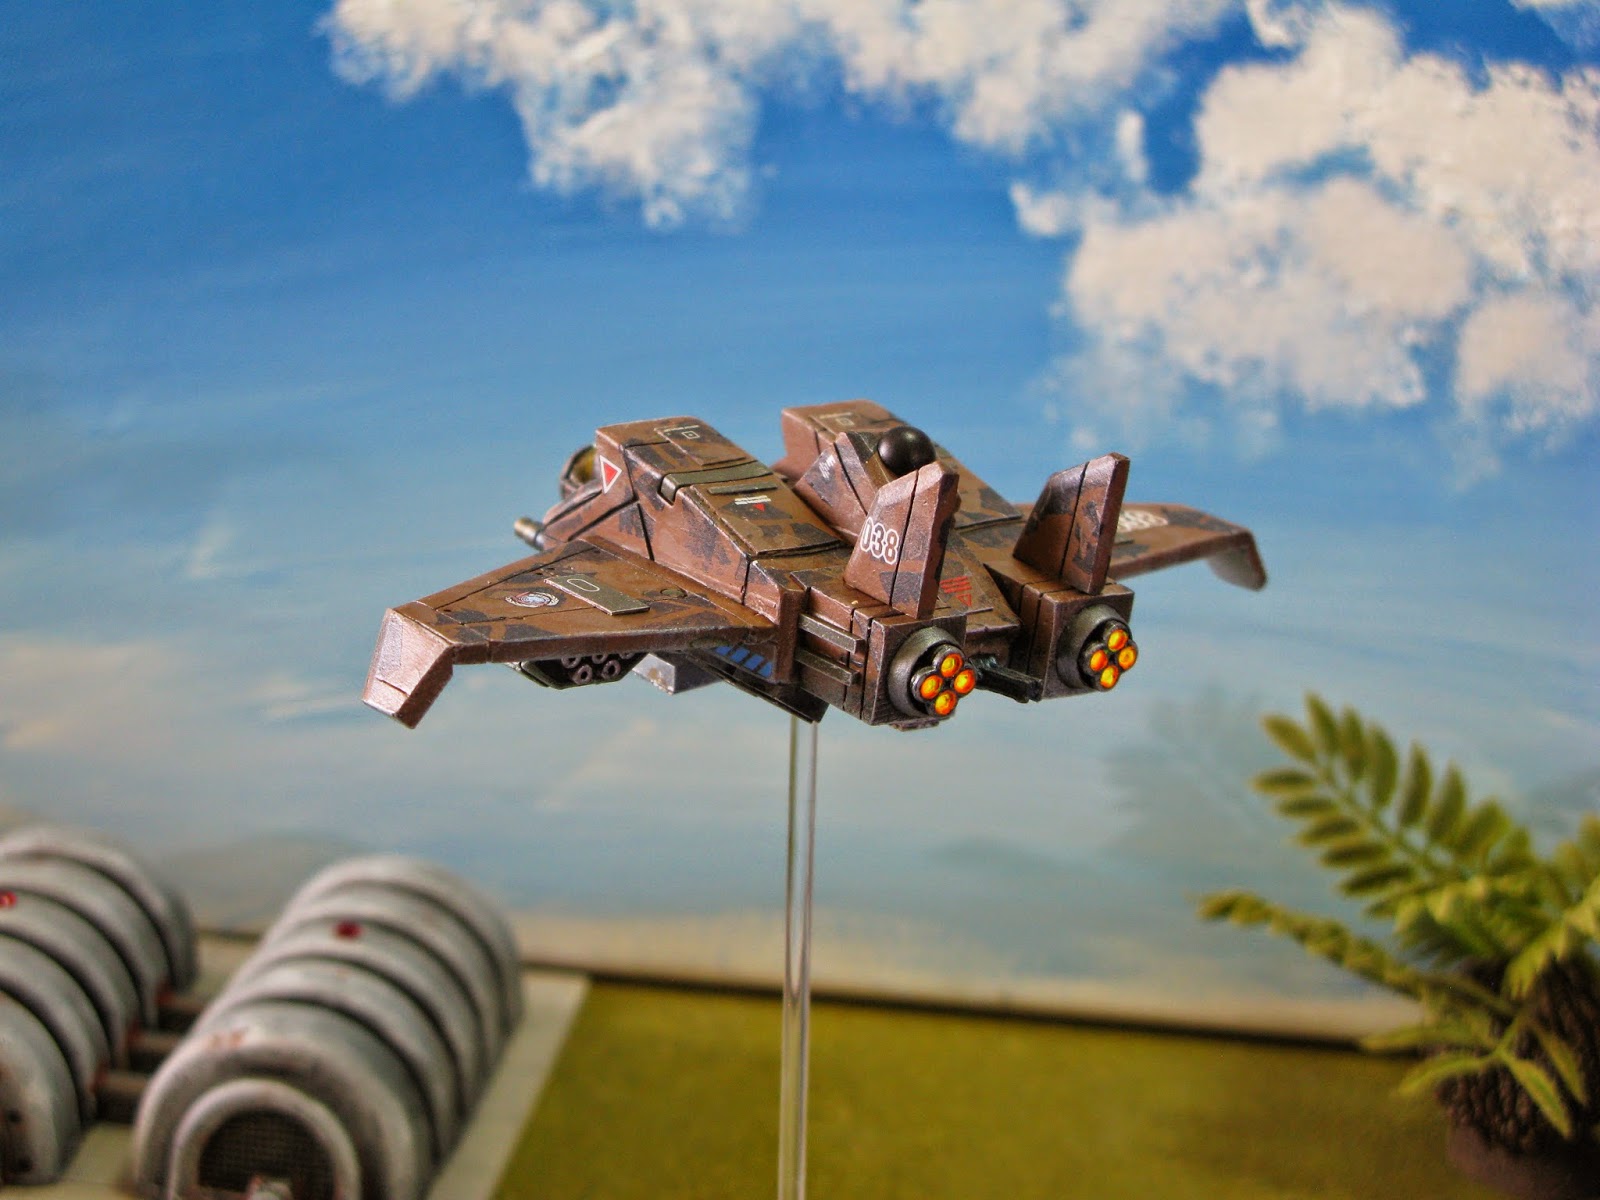
This will come as a shock, but I did NOT modify this at all!


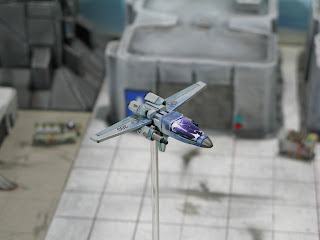
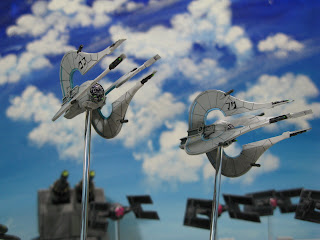
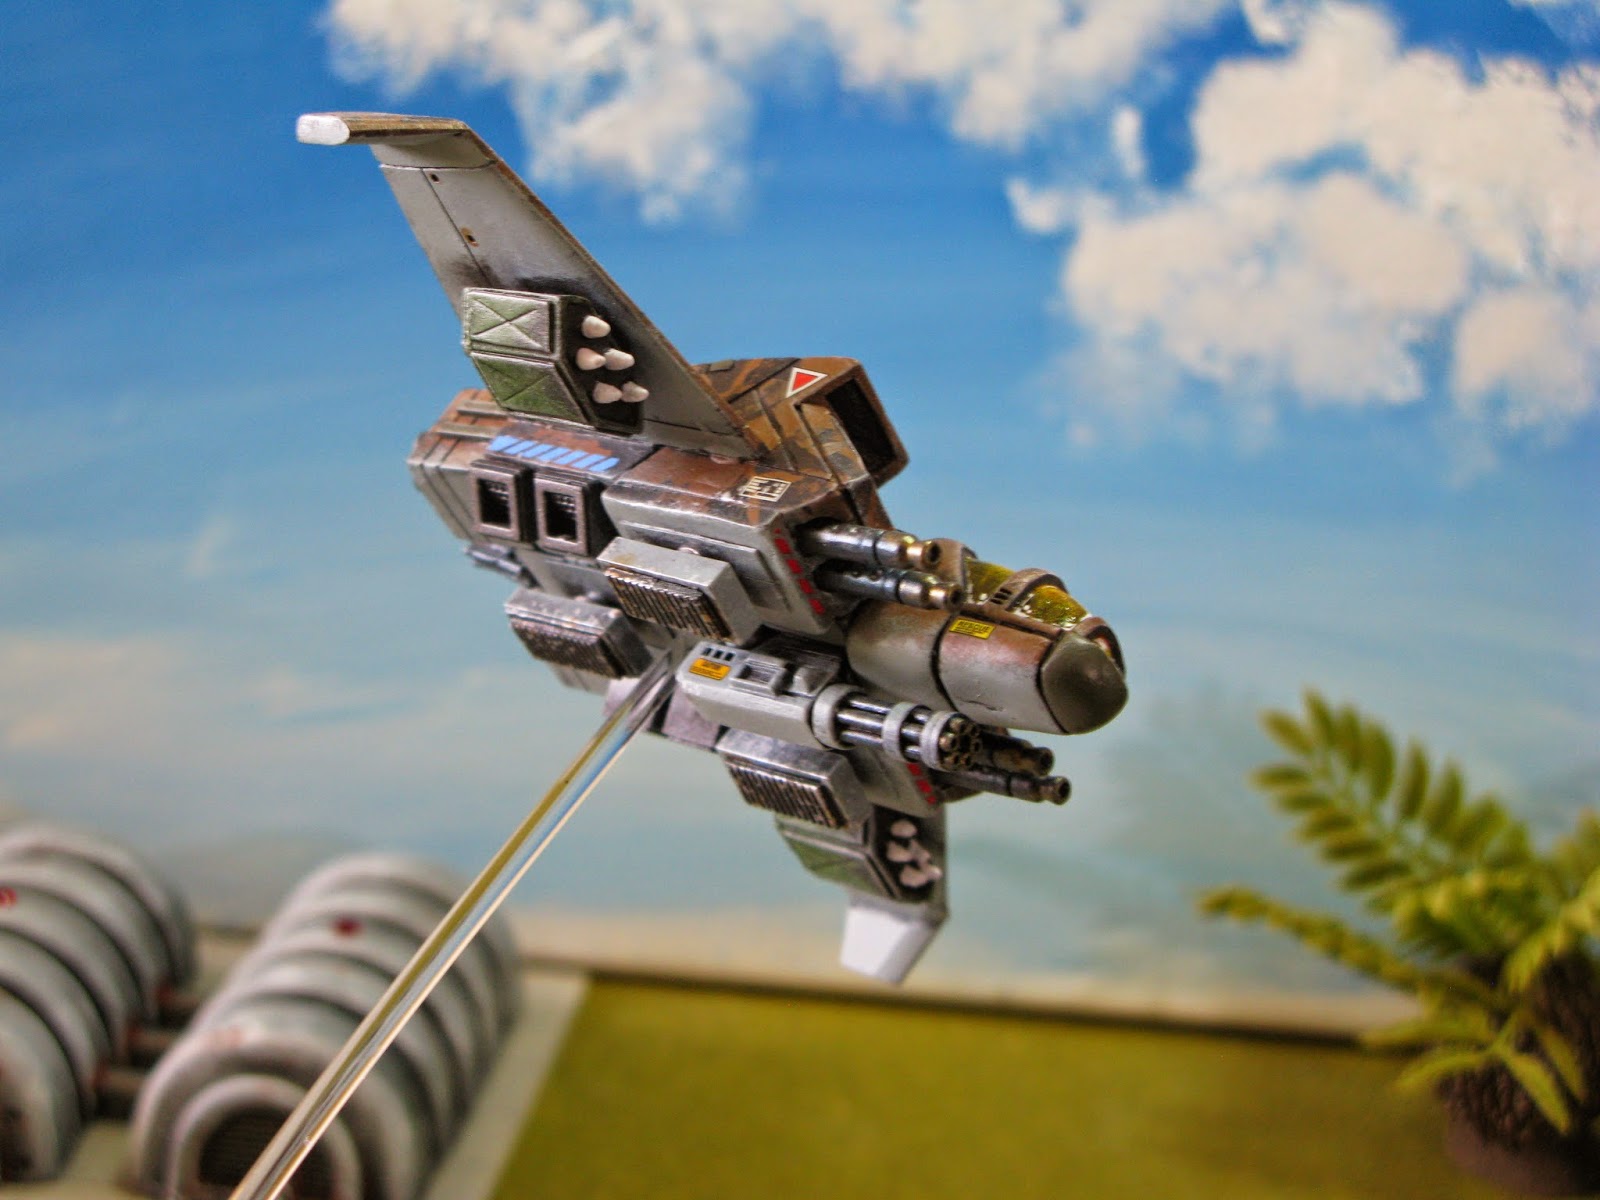
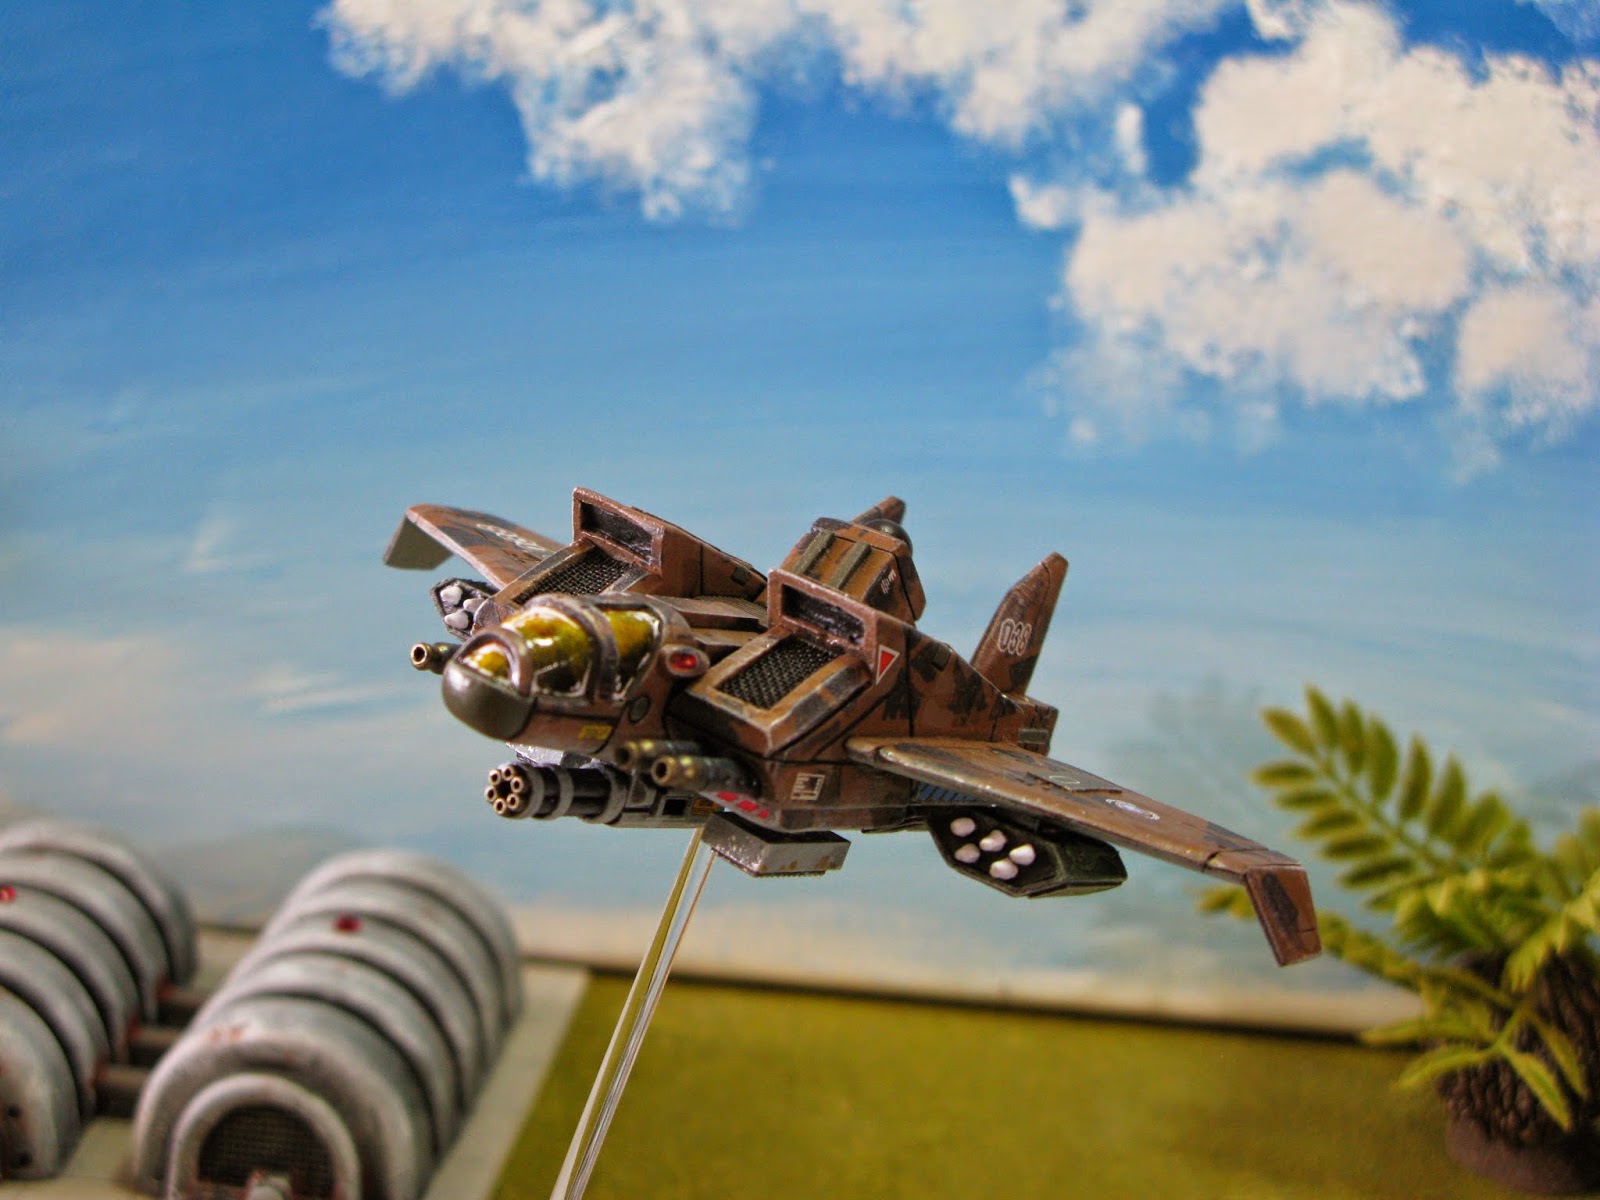
This jet turned out waaaay cooler than i had expected! I will have to buy some more in this series.

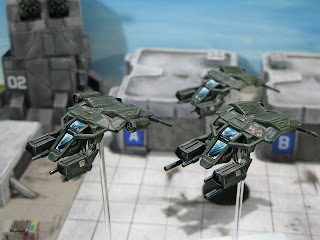
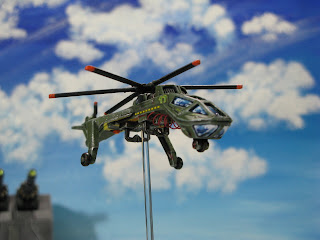
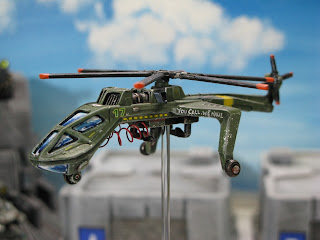
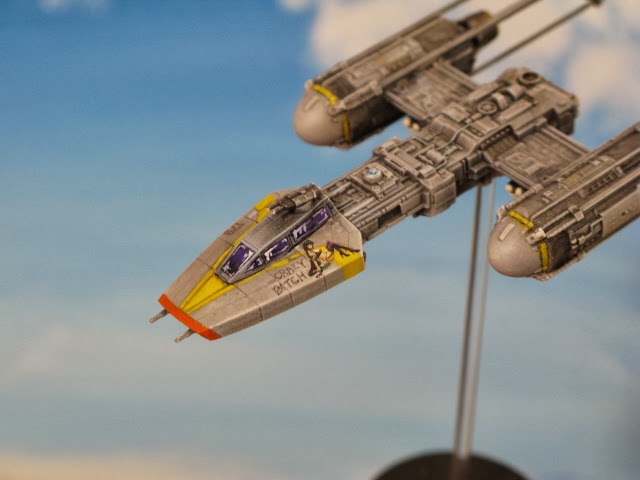
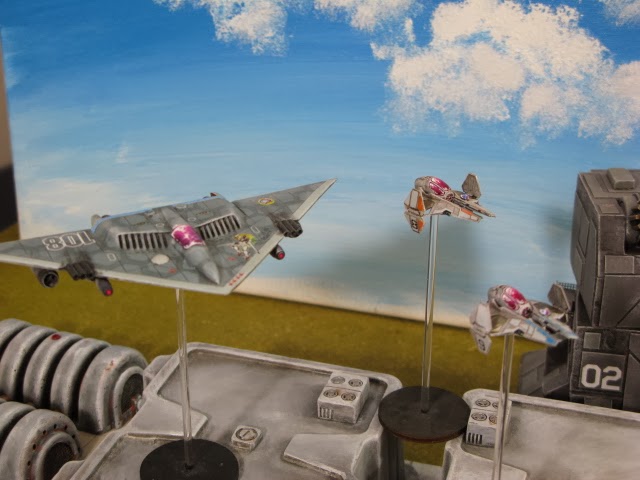
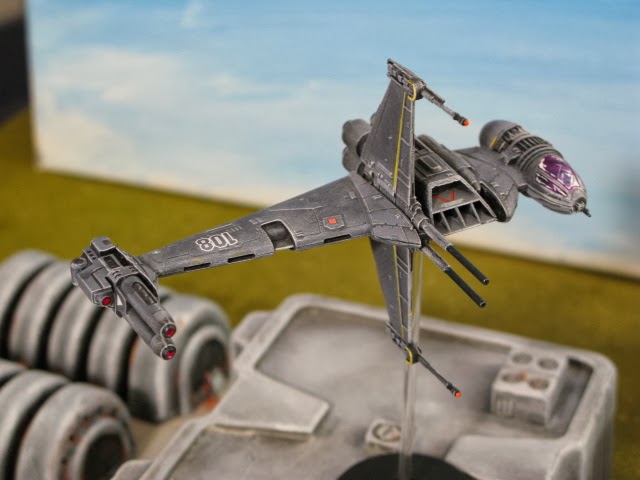
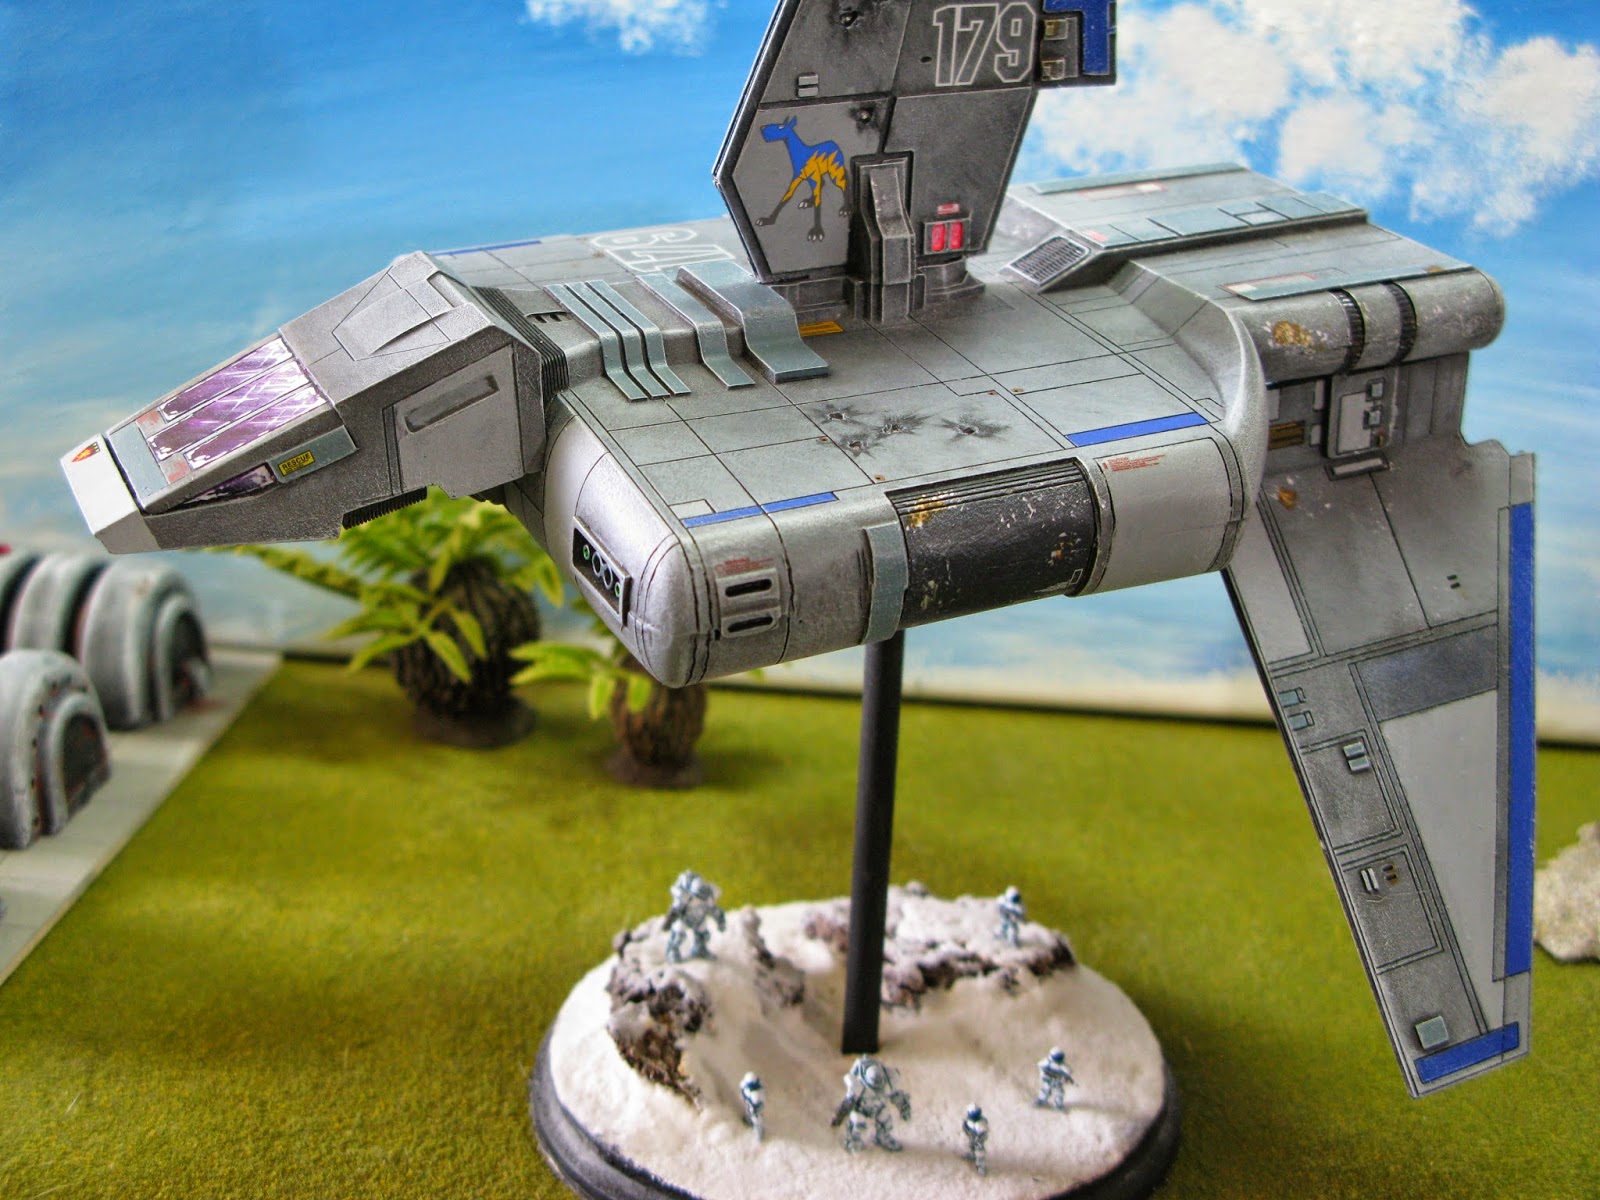
Here is a little gem I found on Shapeways.com. A Halo Hornet!

The mini was not scale-specific, but the dimensions seemed correct for my purpose. Shapeways is a company that will print and sell your 3-D designs for you. Since this was created on a 3-D printer, the details were just a little rough, but not un-workable.


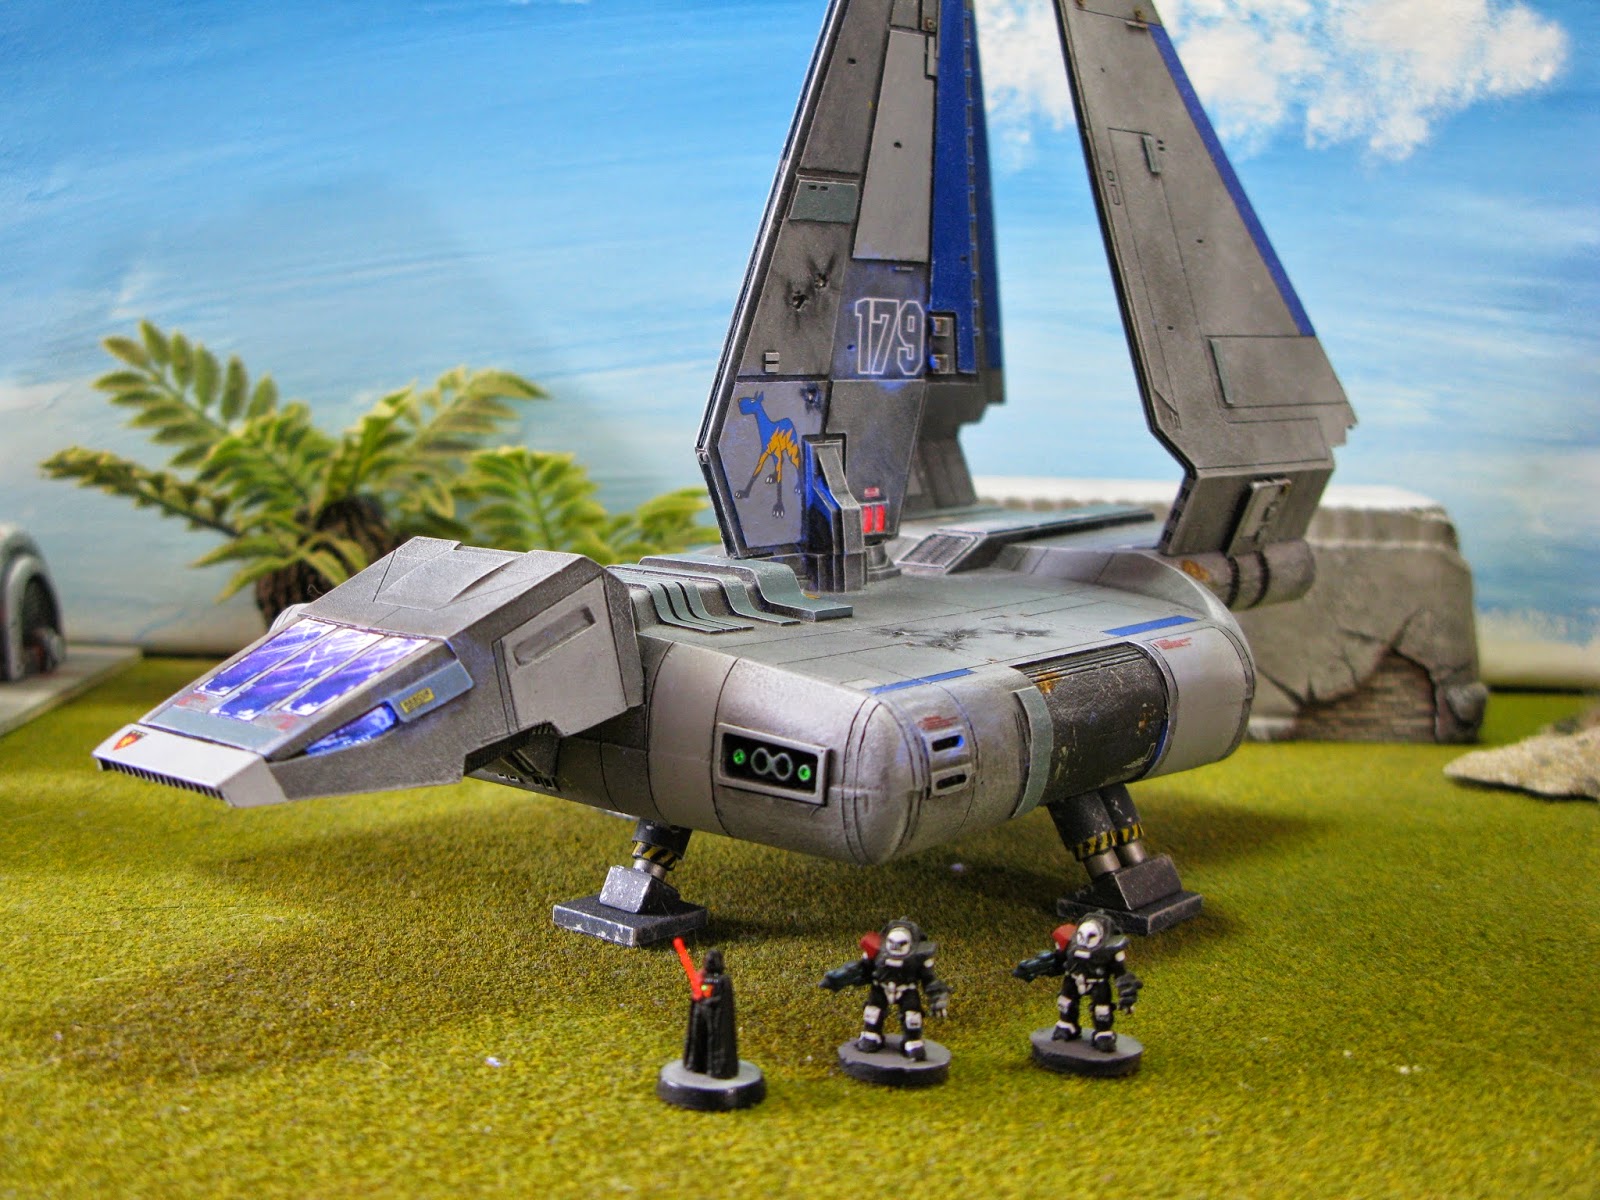
Here she is with my home-made Pelican.


This mini was also one piece! No assembly required. The panel lines are all painted in by me


Well, folks, that concludes this enormous post. I hope you haven't missed me too much. If you have missed me, then this post is my way of saying "I'm sorry for being gone so long". Hopefully my summer will be less hectic because there is still a shit-load of minis to be done in my staging area. Just to give you a few hints at what's to come...

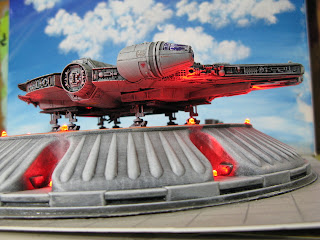
Some new territory- Fleet scale Star Wars! (1/10,000)
Another  Anigrand 1/144 Firespray. (Boba Fett's ship)
Three- yes, three Anigrand 1/144 Imperial Sentinel class assault shuttles- one inspired by the AC-130!!!!
Anigrand 1/144 Imperial Lambda shuttle.
A handful of TIE Predators.
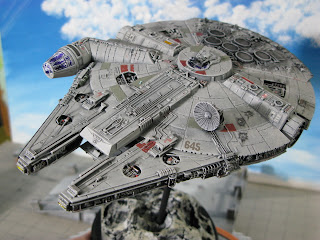
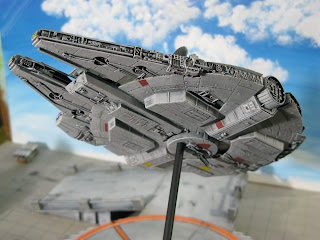
1/144 Fine Molds Millenium Falcon.
Another 1/144 Fantastic Plastic Gunstar.
Another 1/200 Destroid Monster- heavy on the mods.
A caseful of more 1/144 F-toy Star Wars models.
Quite possibly a painting tutorial vid!!!!


And much, much more. So stay tuned and be patient. I certainly appreciate all of you who follow me and hope you are still enjoying the show!!!!

A Bird Theme: Raptors And A Falcon

$
0
0
Well, I was going to take these to Gen Con with me and enter them in the Miniature painting contest in the Vehicle/War Machine category, but my hotel had over-booked and I lost the room I thought I had. My loss is your gain, so to speak, because I wasn't going to post the Falcon until after I came home with a first place ribbon! A big thank you to Jon Paulson of Paulson Games for creating such a fantastic miniature...the Raptor mech, that is! By the way, if you want one of your own and want to see the other cool stuff that is to come, go here:
http://www.mechafront.com/page/page/8798042.htm

On with the show....


Here is the first of four Raptor mechs I have. This comes from the Mecha Front game by Paulson Games. It is a stock Raptor with no modifications other than a comm antenna. The size of this beauty makes it perfect for 10mm or 15mm gaming. The half track is a heavily modified MW:DA JES missile carrier...minus the missiles now!

Also of interest are the military buildings. They are plaster castings of empty Oreo cookie trays with Lego bits and other do-dads to help with the details.

Rear view.


Now we have the heavily modified version. The first thing I wanted to do was modify the static pose into an action pose. I also wanted a slightly different load-out. A big flame thrower and a mech-sized minigun!

The napalm fuel tank is a Lego bit. The flamer thrower had one hose attached to it already, but there are two tanks....

I added the hose that snakes up over the shoulder by clipping a length of cheap necklace. The right foot is glued up in a half step. Since the bottom of the foot was exposed, I had to engrave a tread pattern to the bottom with my Dremel. I wanted to extend the left leg into a striding pose so I cut the knee, sculpted a new knee joint and an ankle joint, and them fixed them into a new pose.

The dripping napalm is a glue-soaked wad of cotton swab, as is the burning puddle on the ground. The flame nozzle is another Lego piece that I drilled some holes into. The other gun is a simple barrel swap. The searchlight is another Lego piece with a jewel fixed into the lens.

The other droplets of napalm are just globs of glue. Here she is with the basic Raptor and A MW:DA Madcat so you can get an idea of how good she looks with my 10mm forces.

I almost forgot! I carved out some side ports for the cockpit and added a hatch and an exhaust vent on top of the mech. I wanted the flamer barrel to look like it was red hot from recent usage...not that the dripping napalm was also a dead give-away.
Oh, one more thing. My friend Owen wanted a close up of the nose art.


Now I present the ship that made the Kessel run in 12 parsecs...the Millennium Falcon! This is the 1/144 scale model from Fine Molds, and I must say it really is fine!

You can see Han Solo discussing his cargo manifest with the port authorities. The landing pad is a Perkins pie pan. The caramel apple pie was delicious, by the way!

You might notice something funny about the landing gear....

....It is a temporary cradle! Since I wanted this to be either in flight or landed, I designed a landing gear cradle using the gear that came with the model and a rig made out of illustration board. They are all aligned so they match up to the underbelly perfectly.

Here she is in flight.

No, it is not lit up. Thanks to the miracle of florescent paint, it only looks like she's in after-burn.

I wanted to add a few extra details to make her a bit more than just out-of-the-box. I added some little detailing decals and a bit of battle damage with my trusty Dremel.

The underside with the landing gear bays sealed permanently.


We're not out of this yet, kid!


The flight base is a bit of custom work using a wooden base, a brass rod, and a chunk of blue styrofoam. I wanted an asteroid look out of the styrofoam so I gouged some holes into it and carefully applied paint stripper to melt the foam into a rugged look.


In case you were wondering just how big she is, here is my thumb.

If the cockpit came with a crew, I would've left it clear. Sadly, there were no crew members included.

The navigation lights and the torpedo bay. I painted the torpedo bay before I assembled her, otherwise there would be no way to paint it, and I didn't want to overlook a thing on this baby.

The amount of detail on this model is simply stunning. Every part fit precisely with no filling and very little sanding required. They aren't know as Fine Molds for nothing!


Well, another successful blog post. I hope you enjoyed it. I guess Gen Con will have to wait until next year.

Finally! First Post Of The New Year.

$
0
0
    God, work sucks! Ever have one of those years when you love your job but the people in charge have about as much leadership skill as class full of kindergartners? Yeah, hopefully the new year will bring better leadership and less stress. I managed to relieve some of my stress by finishing up a few minis here and there. Let's get on with the show, eh.


Here is an AT-TE made by F-Toys. As you can see, it is no longer the standard movie version.

I took the turret off of a MW:DA vehicle and added a pair of missile launchers that I had left over from a Mecha Front Raptor.

The power armor suits are Heavy Gear Flail suits.

You can see from this angle a better shot of the small cockpit guard I added.

Here are both of my AT-TEs ready for battle!

This is a Heavy Gear hover tank that I slightly modified.

I added a set of ball turrets to the side of the hull by using some simple beads and brass tubing.

Then I sculpted some extra missile launchers for the top of the hull. I also added a coaxial gun by using stock plastic tubing and drilling a small hole to install it.

I added a tank commander with a copula gun as well as a bit of stowage.

And finally, I added a large missile launcher to the side of the turret. The launcher is a spare part from an Armored Core mech. I also had to sculpt a small attachment hard point for the launcher to sit on.

Here is a beauty I acquired from a friend over on the Lords Of The Battlefield forum- an old and rare 1/144 scale Yellow Submarine kit of the Macross Spartan, or as I know it, the Archer. I did some extensive modifications to the legs to achieve a much more dynamic pose. There are some other mods that a few of you might be able to pick out.


Here is a close up of the nose art. You can also see how I beefed up the shoulders using some spare Lego parts.


I carefully cut the leg apart at the knee joint using a jeweler's saw. Then I routed out some space with my trusty Dremel to install the new knee joints that I sculpted.

The hip joints have been enhanced with simple beads to create a ball-and-socket joint. I filled in the ankles with a two-part epoxy so the feet had a bit more of an attachment point as well as helping enable the dynamic pose I had in mind.

My model arrived missing the sensor housing on the chin. Rather than fall into depression, I crafted a new and improved chin assembly using Lego bits and spare guns.

Here she is next to an OrkoOne Archer II.

Here is my third Raptor from John Paulson's Mecha Front line. I have done a bit of modifying to her....I know that comes as a shock!

I added some random sensor bit to the top of the hull as well as the two round panels on her nose.

I beefed up the gun barrels using Lego bits and plastic tubing. I also added a pilot hatch to the top and routed out some view ports on both sides of the cockpit.

I added a big exhaust port on the back. the exhaust port is a detail part made by Kotobukiya.

I re-posed the right leg by removing the toes and cutting it at the knee. I then installed tiny beads for the toes to be reattached to and sculpted a new knee joint.

The Raptor family so far. There is still one more to go.

This is an architectural tile made by Tom Spina Designs. It is part of his Death Star tile collection. It is meant for custom interior decorating, but I turned it into a cool building! The top portion of the building is the actual tile. I added the lower portion using blue board.

I used a whole lot of Lego bits and other random parts to customize the building.


 Well, let's see what else I've got here to show.....


The New Year Wouldn't Be The Same Without Some AIRPOWER!!!

$
0
0
The first post of the new year goes to the ground pounders, but I might as well follow up with some more airpower. I do not get tired of things that fly and blow shit up!


I found these by a lucky accident when I was surfing E-Bay. Real 1/144 scale E-Wings! I have no idea who produced them, hell, I didn't even know they existed! Now, here on E-Bay was an auction for two!

Here are the two, freshly repainted and ever-so-slightly modified. I removed the silly laser cannon that overhung the cockpit.

Quite some time ago, I sculpted my own E-Wing from scratch. Here is an idea of just how close I got with my version. Pretty darn close, if I say so myself.


Here is a shot of my other modification: a pair of gun pods under the fuselage made out of brass and plastic tubing.

My own special technique for afterburn... florescent paint!


The requirement of any E-Wing ace....nose art and kill marks!


This is another F-Toys Y Wing. I decided to keep her close to the movie colors with maybe a few little embellishments.


Nose art is always a plus!

Now here's the big surprise. I installed a pair of MW:DA launchers under the engine spars.

A flight of X-Wings screaming past a turbolaser tower!

I wanted to keep my two new additions close to movie colors, so what I did was used a black wood stain on the model rather than repaint the whole thing. The stain is a bit tricky to work with and I wiped off a lot of excess with a sponge and my finger.

I enhanced the battle damage on this X-Wing with a bit of paint. I also painted over the clear cockpit in favor of my more colorful version.

Red five. I had to paint a little red eye on R2-D2. I also enhanced the color of the engines with some regular painting.


What would a picture of an X-Wing be without a classic dogfight shot.


Here is a 1/144 scale Narn fighter from Babylon 5. This little beauty was made by Fantastic Plastic. They are OOP now.

I did the camo pattern by using a piece of foam rubber that I carved into a kind of rubber stamp. I merely stamped the pattern onto the mini.

I thought this craft looked like it should have VTOL engines, so I added some! I decided it needed an extra cannon on the belly, too.


Yet another Valkyrie, and, yes, modified.


A better shot of the modifications. A pair of MW:DA missile launchers, a pair of Lego guns, and the main cannon that came with the model.


I added the little radar dome.

Both Valks flying formation with an X-Wing.

Here's a bit of fun....Converting a MIG-25 into something a bit more sci-fi.


Lots of guns added: the wing tips and the fuselage are now hard points. I liked the missiles that came with her, so I kept them. No unfriendly dropships in my skies!

Here you can see the MPG rating going down the toilet.


Same scale.

Here is another Babylon 5 ship: the Pirate Fighter. Once again made by Fantastic Plastic and also OOP.

I did a bit of modifying. There is now a trio of cannons on both wings.

I also added the radar dome and a pair of fuel hatches near the rear of the fighter.

How about more firepower? You bet! I added a pair of Paulson Games laser cannons and then sculpted my own rocket launchers.


Anybody guess the reference by the nose art? I'll give you a hint: Hot 80's rock goddess.

Little friends!

I painted these a while ago, but ended up hating the paint jobs. I finally got around to fixing them. Here are my two newly refinished Jedi ETA-2 interceptors


I have three of the F-Toys B-Wings. It couldn't hurt to modify one just a tiny bit, right? How about a heavy B-Wing?

I added some cannons to the center where the wings connect. I can't explain why I like the B-Wing positioned in such an asymmetrical flight pose, but I do.


If I'm going to add more firepower, I better beef up the engines. I used some Lego bits and Kotobukiya parts to give her some extra horsepower...or should I say bantha power?

I added what could be classified as light turbolasers by using a dual laser cannon part from Paulson Games.

I finally got my hands on a couple of the F-Toys TIE Interceptors.

Yes, I know the twin ion engines are supposed to be just pinpoints to either side of where I painted the engine, but I like mine better.


Now, how's that for an update? It shouldn't be too much longer before I finish my second batch of projects and unleash them here on my blog. Until then, I wish you all a happy new year and thanks a whole lot for following my blog!

Not Only A New Post, But A Brand New Sculpt.

$
0
0
Sorry about the long absence again! I have a good excuse this time: my Canon G9 Powershot broke down back in April and I finally got it back a couple weeks ago, better than new! To celebrate my "new" camera, I have lots of stuff to share with all of you. I will begin my update with my very own sculpture. This heavy gunship was loosely modeled after an old Silent Death miniature that I dug out of my collection. I decided that mini needed to be re-done in my proper 10mm scale. Here are my results....


Guns, missiles, and ECM capabilities, oh my!

Did some experimenting with a gold ink on the cockpit.

Of course, did the usual florescent painted thrusters.

And the belly view. The gatling cannon is made by Paulson games. The four autocannons are Lego parts made by Brickmania. The landing gear and VTOL thrusters are also Lego bits. The missile pods came off of a MW:DA mech called a Targe.

Of course, I did not sculpt everything on this baby. There are also various plastic parts that I cut to fit my design.

Coming in HOT!

Here she is next to the original miniature that I used for my inspiration. I also threw in a few 1/144 scale ground crew to give you a better idea of how big she is.


Not only did I get a sculpt done, but lots and lots of other miniatures as well. Just so this post isn't too short, I will show off yet another one of my Star Wars treasures- the first of three Anigrand Sentinel assault shuttles that I have finished.


She's not in any "official" colors, but she still paints up quite nicely.


I decided to finally go with a blue florescent thruster color. I am pleased with how this one turned out. You can also see where I added a pair of plastic strips to keep the wings from elevating too far in landing mode.

I added tiny scrap-booking jewels to the heavy laser cannons.

Underside view. I glued the landing gear bays shut because I had something a lot better in mind which you will see below...


I wanted to make a cool flight base to go with a cool model. I don't do a lot of snow effects, but this was fun! If you look closely, you can see footprints in the snow. The snow itself is Arm & Hammer baking soda.

Here she is with my new landing gear attached.

I made a landing gear cradle so I can switch her back and forth. The landing gear that came with the shuttle looked too frail to support the craft, not to mention there were only two legs to land on. I decided to make the landing gear a bit more robust as well as balanced. I measured out a piece of illustration board and installed the landing gear, which is made from Legos and plastic tubing.

In all, the Anigrand model is not for the inexperienced or impatient. The wings required a little straightening. I had to do a bit of sanding, routing, and filling to get some of the parts to fit correctly, and even then, she isn't 100% perfect. I hope with the experience I got from this one, my other two should go together a lot smoother. Anyway, I hope you enjoyed the show!

And Now For Some Battlemechs!

$
0
0
You wouldn't be looking at my blog if you didn't love big, stompy mechs! I wouldn't be sharing my creations with you if I didn't share that same love! Soooooo....Bring on the battlemechs!


The Battletech Stalker like you've never seen it before...er...Assuming you have seen it before. All I can remember about this kit is that it took forever to actually receive it after I paid for it. Next to her is a MW:DA Uller.

I altered the legs so the mech now has a bird stance instead of human-like. I had to sculpt some knee joints to make the new stance possible. The Uller has new hands, a shaved cockpit, and an new, improved center laser.

A better view of my new knee joints.

The round hatch on the side of the launcher was a small cosmetic detail that i decided to add.

I also added gun barrels to the side lasers.


I also added the searchlight and the pilot hatch. I also drilled out the launch tubes.


Here is my version of the classic Urbanmech. I sculpted this one myself.

Next to a MW:DA Uziel. Not too bad, scale-wise, if I say so myself.


Some of my details a re a little rough, but I am pleased with the way the little guy turned out.


Here is a Battletech Black Lanner. This is a resin garage kit made by a friend of mine. I altered mine in a few minor ways. I etched a few new armor panel lines into mine, for starters.

The sensor node in the nose, the pilot hatch, and the intake screens are also my additions.

I drilled some ports on the side of the nose and drilled holes in the arm lasers to create a cooling jacket.

I added all the exhaust vents and the engine hatch in the middle.

I paired her up with a heavily modified MW:DA Madcat.


The Madcat has new, improved arms and arm cannons. The elbow joints are simple beads joined to a Lego bicep. The cannons are bits by Paulson Games. The left torso cannon is a combination of what I think was a Star Wars gun and some new barrel parts.

This is a heavily modified Mech from the old Front Mission video game.

I added the entire flight/jump system by using some spare Gundam parts.


I also added the missile packs and the arm cannons. The arm cannons are also add-ons from Paulson Games. Wonderful stuff, by the way!

Here is a view the the small maneuvering flaps stowed away. Those intake nozzles are also spare parts that I added.

This beauty is also a resin garage kit. The guy who sculpted this goes by the tag name of Elfbait. I know this is the awesome MWO version of the Atlas, but I'm not sure if a 3-D render was made on a printer or if he hand-sculpted this. Either way, this is a fantastic mini!
I made a few cosmetic changes again. I sculpted some new shoulder joints to give my Atlas broader shoulders. I drilled out the arm lasers to hold some scrap-booking jewels.


I had a little fun with painting source lighting in the eyes and "cheeks".

Here is the MWO Atlas next to a new version Madcat (modified, of course).

This cat has new missile tubes and targeting lasers that I sculpted.

The small intake vent just behind the cockpit was also sculpted by me. The chin gun and arm cannons are Paulson Games add-ons.

Anybody familiar with the original mini will know what I did here. I shaved the rear missile ports completely off and added some simple cosmetic details...tank wheels from the bits box.

I've also heard a lot of people wonder just how big a Heavy Gear mech is compared to Battletech mecha...So here ya go!


I suppose that will be enough for this post, but I still have a few more to come......

Even More Mini Madness!

$
0
0
   
A pair of interesting war machines...

The one on the left is a MW:DA Behemoth with a new turret that I sculpted and added spare parts to, and a set of added track guards. The one on the right is a radically altered Necron Destroyer.


Star Wars Titanium Series toys converted for tabletop duty!

Here is an official 1/144 scale F-Toy AAT for comparison. While the T series lack the detail that the F-Toy model has, they are pretty much spot-on when it comes to size.

A converted Action Fleet MTT. Again, the scale is pretty spot-on!

I added a bit of battle damage.

I also had to fill in a gap on the top where I removed a lever.

I removed the droid rack to make it a more versatile heavy transport.


This is a Gundam tank. I am not familiar with the Gundam series so I can't tell you what it was, but I can tell you that it is definitely not in its original condition.
I sculpted a new turret and added some of Paulson's add-on cannons.

The railings on top of the turret are staples!


I added the trio of ball turrets to each side by Dremeling a hole, inserting a bead, and then installing the gun barrels. I tried to make the headlights look like they were lit up, too.

This was just an experiment with battle damage. I wanted a tank that was through Hell and made it back....barely. All of the damage was done with a router attachment on  my trusty Dremel.

The damage doesn't look as bad from this side!

I also experimented with colors by trying to make glowing embers and leaking coolant.

A Gundam gun truck with added stowage and cargo bed rails. Once again, I used staples to make the cargo rails.


This is another heavily modified Front Mission mech. These trading figures have awesome detail and are fully articulate, but I have glued the legs into a static pose, but the arms still move and the torso is capable of turning.

What did I add here? I added the massive gatling cannon to the right arm and a secondary gun to the left arm.

The backpack is scratch-built from spare parts and a pair of .30cal Lego machine guns from Brickmania.

I also added a small tracking radar dome to the top of the hull.


Another heavily modified Front Mission trading figure.

I added the left shoulder cannon and the gatling gun. The ammo drum is a Lego piece with some other detailing parts. I was trying to create the effect of glowing hot barrels after a sustained barrage of lead.


I also added the missile pod.

A pair of MW:DA mods: the Madcat III on the left and the Blackhawk on the right. There are more pics of these towards the bottom of this page where I can better show and tell what I have done to them, although those of you familiar with the original minis will be able to pick out some new features.

Another Front Mission mecha. The turrets used to be Gundam shoulders.

I added the massive rail gun to the left arm and quad lasers tucked under each arm.

The mech came with a really boring mace so I sculpted an axe head for it. I also added a small gun to the forearm.


An interesting feature of the base- Those ferns used to be seashells.

This is another vehicle from the Gundam universe that I converted for my own use. The thing turned out to be a LOT bigger than I thought it would be....Heavy gunship it is!

The dorsal wings used to be tail wings, but I broke the attachments during assembly. The back was the only logical place for me to relocate them. I actually like them there!

You can just see the tail gun turret I added.


You can see my additions here. A pair of missile launchers and autocannons. The big guns were part of the original model.

The wings sweep!

Let's mix up universes, shall we?


I wanted a bit more bite for my Cylon Raider. This one got a tail gun turret.

It also got an extra set of laser cannons.

Just a simple A-Wing.

The pilot has affectionately named his bird the "Rebel Princess".


More mixings...An X-Wing and a mkIV Viper.

I was not happy with the stock laser cannons so I upgraded the gun barrels to make them look a bit more lethal.


More firepower stowed underneath!

More Star Wars.....Except I created a fleet buster TIE Bomber!


This B-Wing is my third one. I decided to leave this one stock and even kept the colors pretty close to original.


Here is the Madcat III again. Now you can see where I reposed the right leg, beefed up the gun barrels on the arm pods, and altered the missile launchers to something a bit more fitting for a smaller mech.


A better view of the Blackhawk. I sculpted new gun pods for the arms and swapped out the old hands for smaller ones.

I sculpted new improved feet. The old feet were just silly.

I also re-did the knees to make them look functional.
PHEWWW! Well that was a long post! I do hope you enjoyed the show. I am sorry to have kept you waiting again.

Finally...A Simple Tutorial For Cool Canopies.

$
0
0
Well, I promised a video some time ago, but my attempt at a video was literally as boring as watching paint dry. So I went with the simple solution- a step-by-step tutorial on one of my newest projects.


Let me start by showing you an in-progress shot of my newest project: the Starship Troopers dropship in 10mm. I was using an old Micro Machine as my reference.

Now many hours later, here is how I do my canopies. STEP 1: Apply a very dark base color. A very dark shade of your desired color or a simple black will do. I have chosen black here.

STEP 2: I use a white craft paint to lay down some highlights on the cockpit canopy. This starts out with light brush strokes and the thinness of the paint actually helps this process. Then I build up a bit more white up in the corners.

STEP 3: After waiting for the white to completely dry, I decide to go with an aqua ink wash. I do NOT dilute my ink with any water. As you can see, the ink creates a nice, blended effect.

STEP 4: Adding the harsh reflections is a little tricky if you don't have a steady hand or haven't watched a lot of Japanese anime for inspiration. I switch to the Vallejo white because it is a thicker and more pure white color that is required for a really dramatic effect. You can just do some simple corner and edge lining and maybe put a couple of reflection dots in a corner or two, but I am not one for ho-hum! I like to make my canopy glass interesting.

Half Track...All Business.

$
0
0

This is the anti-mech half track. This began life as a MW JES missile carrier. I tore of the missile racks and sculpted a flat bed where the gun would be housed. The gun itself is readily recognizable- a German 88 from the Flames Of War collection. I added the gun crew from miscellaneous MW infantry pieces and added a more sophisticated targeting array to the front of the gun shield. I replaced the front wheels with the wheels from the 88's gun carriage because they looked a bit more rugged. I sculpted the side stabilizer housings and then used a pair of braces from the 88. Finally, I added some stowage and a front winch that I picked out of my spare parts bin.


Here is an action shot of a troop transport and an artillery half track setting up shop along the shore of a shallow stream.

Once again, a JES missile carrier gave its life to become one of my most devious war machines: a mine layer! I sculpted the entire cargo body and just stuck it on the back of the now-bare chassis. Of course I then had to make a minefield for my busy little layer. If you look closely, you can see a few of the anti-mech mines in the freshly sowed field.


You can see part of another of my older half tracks guarding the busy little layer.

This track used to be a MW recovery vehicle. Once I removed the repair arms, I thought the empty bed looked like benches. Naturally, I inserted some seated infantry then added a small support cannon.


Same chassis as above, different purpose. This one is part of the artillery section. I sculpted a small housing to attach the actuators to. The actuators are ankle joints from a Gundam model, I think. The missile pod came from a 1:100 scale Macross tomahawk ( a warhammer to us Battletechies ). I sculpted a small body for the targeting array and sculpted some small cargo boxes for the stowage racks. Finally, I added an MG42 ( another FOW piece ) and a hatch to the top of the crew cabin.


Here is a family shot. Anybody notice the super-secret easter egg in the picture?

Here are some of my ECM/ recon elements. The little hover tank began life as a Star Wars battle droid backpack. The wheeled truck was an APC until i added the electronic gear to the hull. The massive half track is basically a MW mobile HQ. I upgraded the satellite dish, added the comm pod to the side, and the ECM dome to the rear of the hull.


Real Men Paint It Pink....

$
0
0
This is a commission for a charity auction winner that I just recently finished. He has a custom mech company called the Barbie Brigade. Their unit colors are...well...a bit unusual for a war machine, but who am I to turn down such a challenge? He gave me the general color scheme- pink with white trim- and I went from there. This mini is a classic 1:300 scale marauder II approx 2in. or 4.5cm tall. He also supplied me with a pin up girl decal and the unit decal. I altered a few details that I didn't like about the original mini. I enlarged the PPC barrels on the arm pods to look like proper heavy weapons. Then I enhanced the hull cannon by replacing the barrel with something more suitable. I also beefed up the turret attachment for the hull cannon. Then finally I replaced the old exhaust vents with my new, improved versions. The old ones looked like flower petals.


New barrels on all the big guns! Scandalous art work on the nose, ohh-la-la!


New vents!

Those are tiny, blue, reflective jewels in the gun barrels on the arm pods.

The Cherry Blossom Tank.

$
0
0
My friend, Owen, is starting a 15mm army. He wants his army to have a Japanese-inspired color scheme. He sent me a package full of miniature goodies. In the box was a note saying I can keep everything in the box on one condition: I must paint the tank for him...The note was written on a printout of some pictures of a color scheme he had in mind. With the pictures close by on my desk, I accepted the challenge! What you see here are the results of that challenge: paint a cherry blossom tree on the tank!
    The tank is made by Khurasan Miniatures. It is a 15mm red faction tank with the red eagle turret option. I'm gonna have to get a couple of these for myself now. I added a few extra details: the muzzle brake, the crew shovel on the hull, and the screen covers on the turret.


I threw in a few of my own 10mm minis to give you a sense of scale. This tank would make an excellent Battletech super-heavy...with a few more guns!


My Ultimate Mech Bay.

$
0
0
Here is one of my little pet projects that has been on and off my priority list for quite a while. This is the closest to finished it has been so far. I threw in a bunch of eye candy as well. These are four separate mech bays made by Kotobukiya of Japan. I am currently in the process of permanently mounting the four bays onto a plank of wood so that I could move it from place to place a whole lot easier. Why, you might ask, do I need to move them all together? Just wait until you get to the bottom of the page.....

The loading claw in the foreground is fully articulate and it comes with an interchangeable engineer platform.


Here you can see a custom control booth that I scratch-built to monitor the flow of traffic in my mech bay. I also added some guard rails to the walkway on the right, but I see I have forgotten guard rails on the platform where Han Solo is standing dangerously close to the edge. Oops. I hope there are no surprise OSHA inspections...

The coolant turret with the hoses is also a custom-built piece of my mech bay. The hoses are made from two part epoxy. I think the turret itself might have been part of a Transformer toy.


Ok, now you have a pretty good idea of how busy my mech bay is. Now you are probably asking "Why is this the ultimate mech bay?" Well, here comes the shock and awe portion of my post....


To give my control booth a bit of life, I painted some crew silhouettes inside.


Now you know why the bay door is so big.


I still have to work on toning down the LEDs just a little bit, and the white ones look a bit like the blue ones in some pics, but good grief, it was a lot of work to install them. I believe this little project has been well worth the trouble so far.
Viewing all 36 articles
Browse latest View live